One of the great things about Photoshop is the ease in which you can create powerful effects that can transform an ordinary image into something amazing. The iconic Obama campaign poster was nothing more than a simple Photoshop effect. While there are a myriad of effects to be achieved in a variety of methods, we’re going to focus on the Filter Gallery.
We will use the filter gallery to play with this picture.
 Step 1: Open your picture in Photoshop and go to the Filter menu and go down to Filter Gallery…
 The Filter Gallery will bring up a new screen with a slew of options. Don’t panic. It’s easier than it looks.
Step 2: Go down to the bottom left corner of the screen, where it says 100%. Click on the 100% and select the option Fit In View. You’ll notice there many viewing options. You can change your view as many different ways as you’d like throughout this process. I find it’s easiest to view the whole image and then zoom in from there. The Filter Gallery has 6 main categories: Artistic, Brush Strokes, Distort, Sketch, Stylize and Texture. Each of these categories has at least one (usually more) option to transform your photo. Today we’re only going to focus on the last two categories: Stylize and Texture.
Before we go any further, let me put in my two cents about the Filter Gallery. Yes, it is very fun. Yes, you can make really neat effects. However, it is not perfect for every image. It’s fun every now and then, but not all the time. It’s also a great way to kill a few hours when you’re bored. Use it like salt… well, maybe not how I use salt, otherwise it would be over everything!
Step 3: My Filter Gallery defaulted on the Texture category. Yours might default somewhere else. Either way, please go to the Texture category and select the Grain effect. Your image should change as soon as you select an effect. You may not be able to notice the change right away. Some changes are subtle. There a couple methods to really examine an effect.
METHOD 1: THE EYE
Look in the lower right corner of the screen and you’ll see the word Open and an image of an eye next to it. This eye means the selected effect has been applied. Clicking on the eye will remove the effect so you can see the original image. Now that you have the original image firmly in your mind, click on the place where the eye used to be and the effect will be applied. I find this method particularly useful when trying to determine whether or not I actually want to apply an effect to a picture at all.

METHOD 2: ZOOM IN
The other method to examine an effect is to zoom in on the image. Go to the bottom left corner of the screen and you’ll notice a + and – button. Click these to zoom in or out. As you zoom in and out, you can click and drag the picture with your mouse to reposition it to your liking. If it’s a picture of a person, you’ll likely want to focus most of your attention on the face since that is where the eye naturally gravitates.
Step 4: Zoom in to a focal point on your picture. I found 66% was a good view for this particular image.
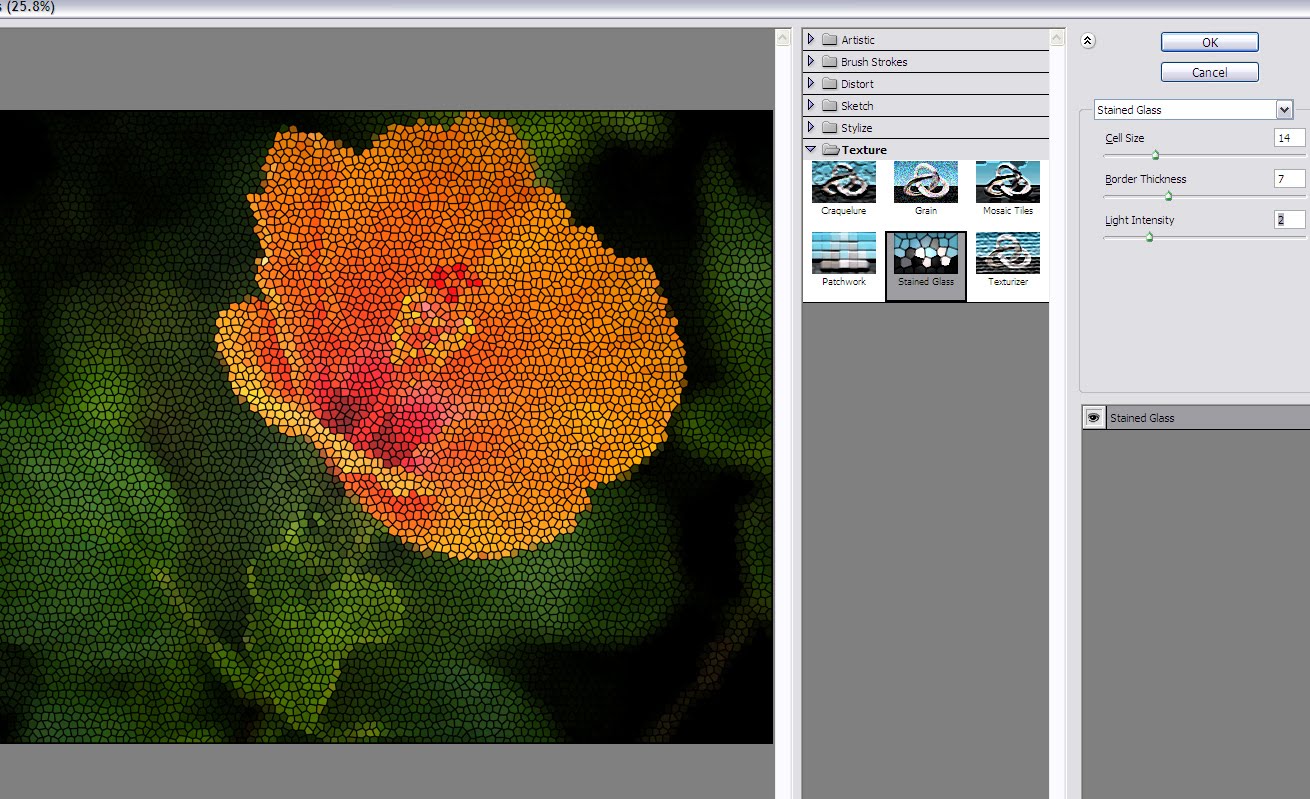
Step 5: Select the Stained Glass effect. It will — surprise, surprise — make your picture look like a stained glass window. However, the default settings may not look impressive. Don’t worry, you have control over these. Underneath the OK and Cancel buttons, you’ll notice three options for the Stained Glass effect: Cell Cize, Border Thickness and Ligh Intensity. These are fairly self-explanatory. Adjust them to your liking.
Every effect has options you can adjust to make that effect really work for you. Because every picture is different, I can’t tell you what the best combination of settings is for your effect. That’s the fun part of this. You get to explore. Don’t worry about something not turning out. You can try as many times as you want and nobody will ever know your first 129 attempts were awful.
Step 6: Try out each of the Texture effects and adjust the settings on each. Also, try out the one Stylize effect.
Step 7: Once your image is just how you like it, press the OK button. If you’ve really messed up, press the Cancel button and go back to the Filter Gallery and start over again.
 I saved some of my experiments below…
CRAQUELURE
This effect simulates a painting on a wall. It adds a bit of texture to the image. I find using less does more in this effect. That is true with most of the texture effects. The idea of adding texture is to add just a little, not make it the dominant focus of the picture.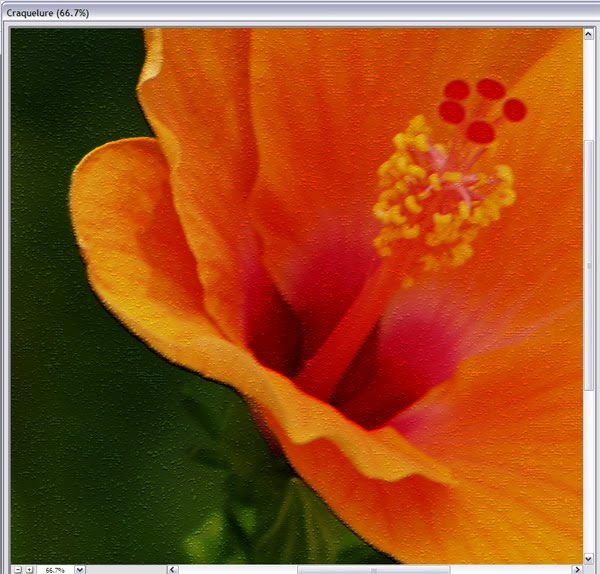 GRAIN
GRAIN
Usually this effect is used to achieve an old-fashioned picture effect. In this case, it really brought out the contrast of this image. I was very pleased with the result of this effect. MOSAIC TILES
To be quite honest, I rarely use this effect. It’s kind of cool, but I can never find just the perfect picture to use it with. PATCHWORK
This effect can be really in-your-face or subtle depending on how you manipulate the settings. I went with a more subtle effect and it’s kind of neat, even if it does make the image look a bit pixelated.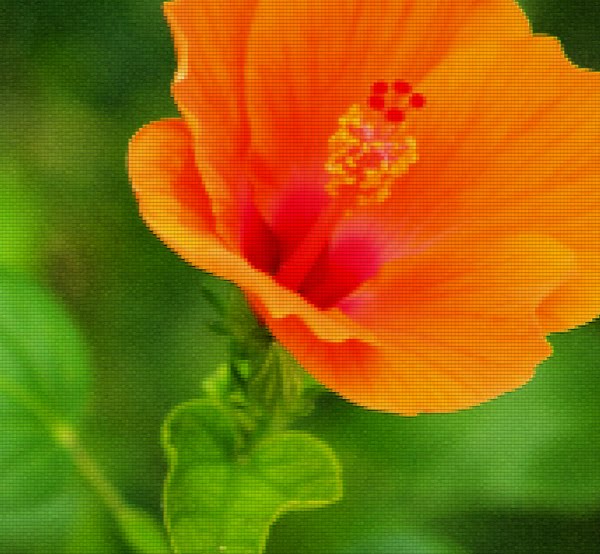 TEXTURIZER
This effect has four subsettings. Find where it says Texturizer and there will be a dropdown menu to the right of it with four options. Each of these sub-options has its own set of settings you can manipulate. I find myself using the texturizer effects more than any other effect because they are so subtle, yet effective in changing the mood and feel of a picture.
BURLAP
BRICK SANDSTONE
 SANDSTONE
This is sandstone again, but I increased the relief option. CANVAS
STYLIZE – GLOWING EDGES
This effect is under the Stylize category. I thought it turned out pretty awesome, like some sort of plant straight out of Avatar.
 So there you have it. Well, at least the effects in two categories. Most of the other categories are pretty self explanatory, but we’ll examine those in future posts. For now, explore and have fun. Please share your creations with me by uploading your pictures here.
Thats so cool, I'll have to give it a try! Thanks, Deb.
You are one talented girl!!! 😉
Wow, that's great!!
Hi, I'm now following you from Fun Follow Friday :)-
Would love if you could hop on over and say hi!
Happy Friday!!
http://www.shoppergal.com/
You have a great blog! I really enjoy.This is very cool.Thanks for sharing this information with us.
Wow, what an awesome blog! I'm following you from NFF. Hope you'll follow back and have a great weekend!
Hi There.
I'm looking for your Friday-Follow post.
Have a great day!
That is a very detailed and informative post. Sadly I do not have Photoshop yet, but I think I need to get it! Following you as part of Friday Follow. Please stop by my blog if you get a chance.
Kathleen
http://www.lifewith4boys.com
Very cool! I posted a photo editing tutorial for FMF, too! But I use Creative Memories software. We have filters, too. 🙂
Follow me back!
Thanks for the tips on PhotoShop. I really need to try some of these. You could make some wonderful, personalized gifts for the holidays and birthdays if you learn all the tricks with this program. Following you now thru Friday Follow Me. Have a good weekend! Pam @ Sallygoodin
Found your blog through Friendly Friday and am glad to be a new follower! Lovely photo ideas.