
DIY Harry Potter Shirts
Uploading your own images
First hit the big Upload Images button on the left hand menu in Cricut Design Space. The next image will pop up. Hit the Upload Image button on the left.
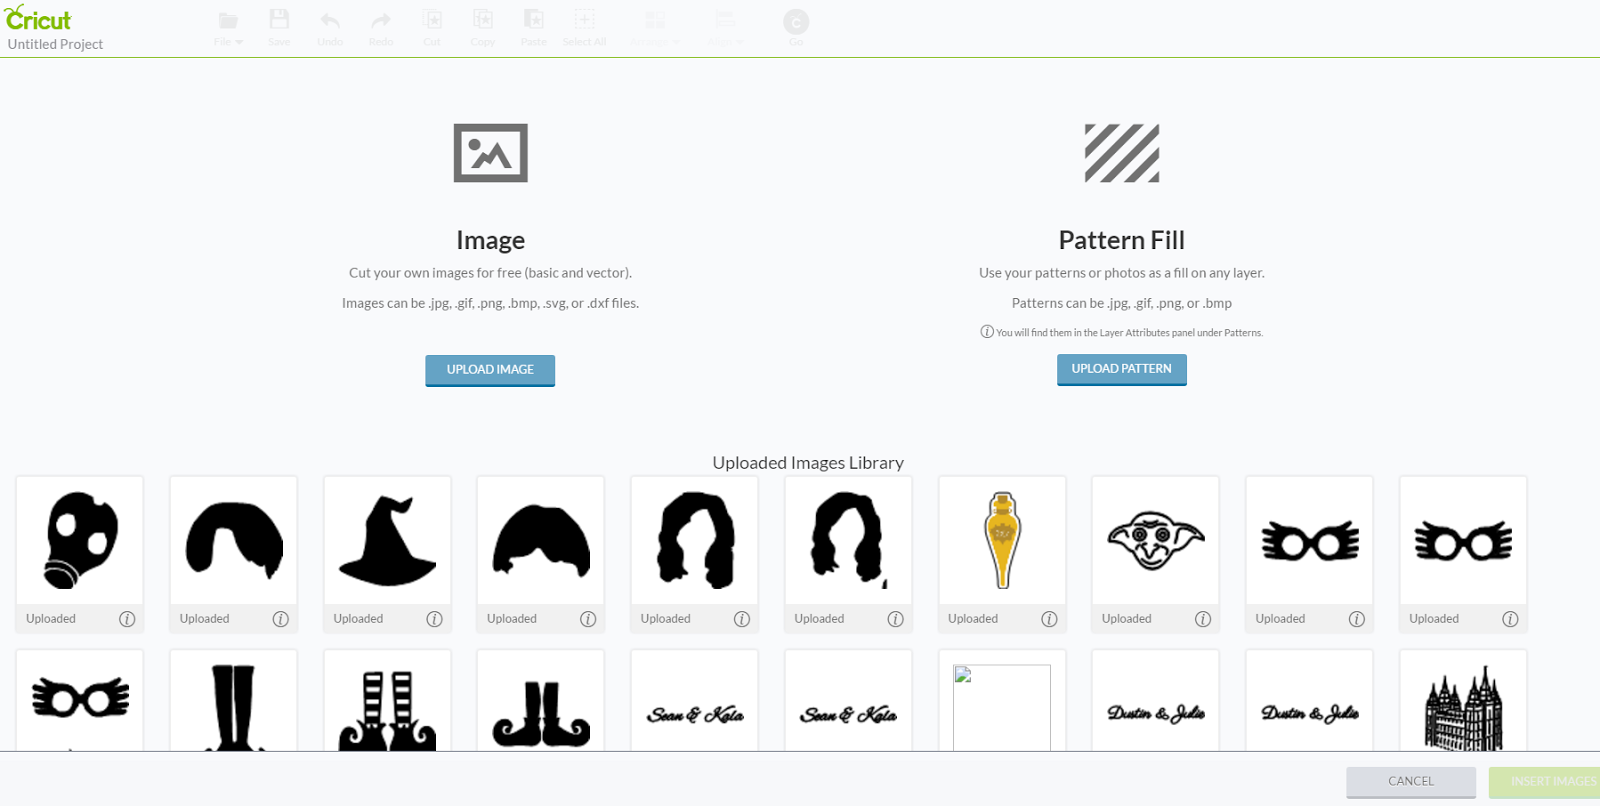
After you hit upload image, the browse screen will come up. Hit browse and find the image you want on your computer. This will let you upload any (.jpg, .gif, .png, .bmp, .svg or .dxf). I always search for images that I want to use in future projects and then save them to my computer so I can upload them. Some of the easiest shapes to trace are ones are silhouettes of something (such as a witch hat) or a line drawing.

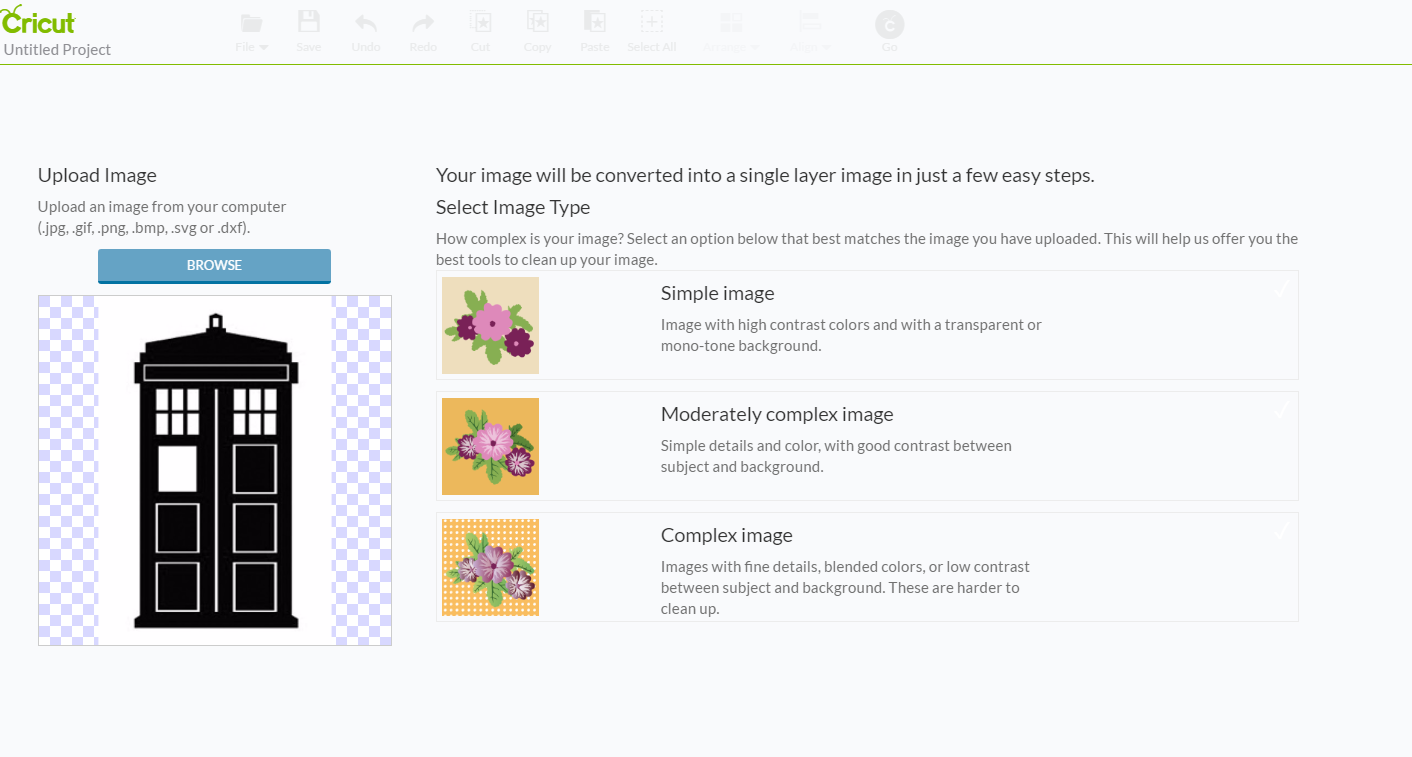
After you select the image on your computer, you will be asked to select the image type. There are three different kinds of image types.
Simple Image– a image with high contrast colors with a monotone background.
Moderately Complex Image– a image with simple detail and colors with good contrast between subject and background
Complex Image– images with fine detail, blended colors or low contrast
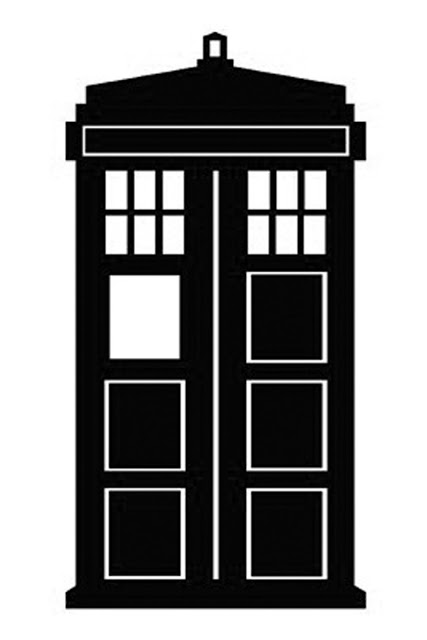
A image like the Tardis I uploaded is a simple image because it has clean lines and a black shape on a white background.
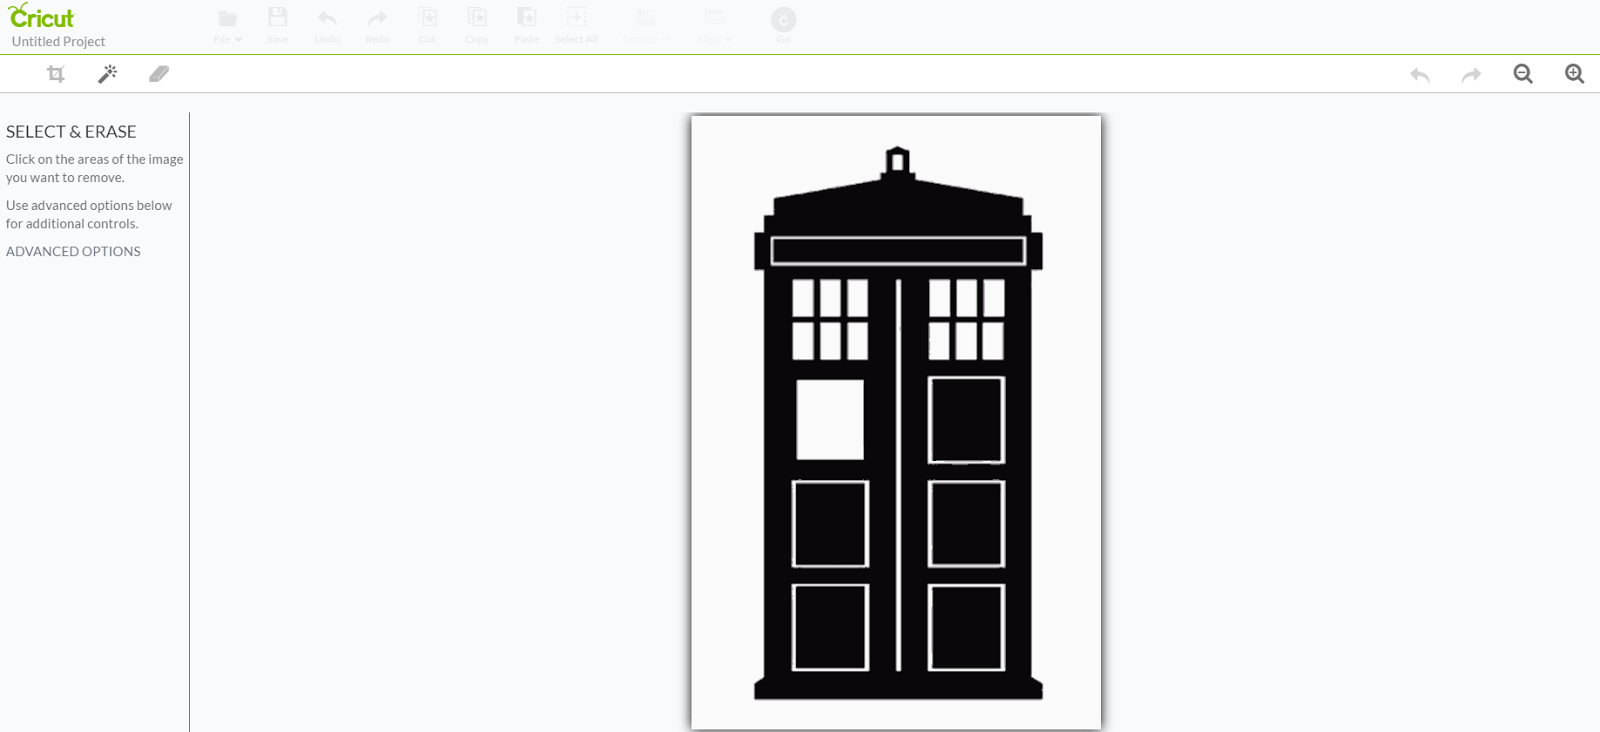
After you select your image type, it is time to clean up the image. There are a few different tools to help you get the image you want.
Crop– This tool will let you crop out any unwanted portions.
Select & Erase- This took is like a little magic wand that will select entire sections. For instance if you click on one of those little white boxes on the Tardis, it will delete the entire white box leaving a transparent background.
Erase– This is like the erasing tool in paint or other programs where you will physically need to draw over every part you want gone.
In most images, you want to erase the background and make it transparent so the Cricut knows what lines to cut. It is really easy to use the Select & Erase tool with this Tardis image. Select each of the boxes and zoom in to select the white lines as well.
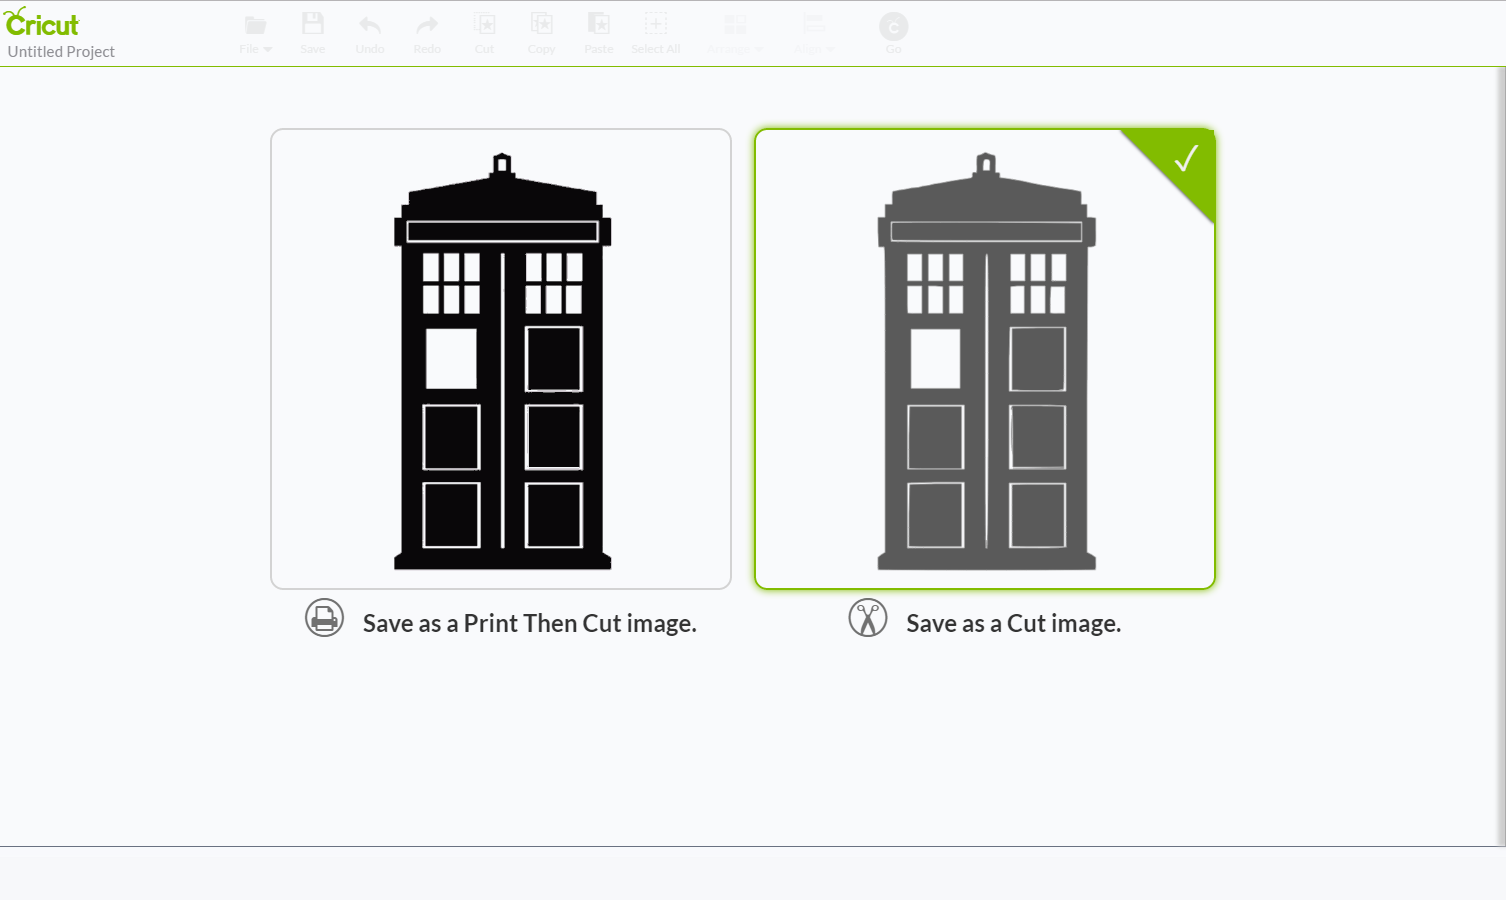
Next name you image and select what kind of image you want Design Space to save it as. Do you want to be able to print the image or do you want to cut all of the details. We want to be able to cut it all out, so we select Save as a Cut Image. This is also a good place to make sure you image looks the way you want it to cut. The Cricut is going to cut everywhere is there is white, so double check in this stage to make sure you have white lines or boxes every where there should be one.
After you save your image, Design Space will take you back to the first Insert Image screen, but this time the image you uploaded will be in the library ready for you to insert it. Insert it into your project and now you can move it, resize it and add any text that you may want for your project.
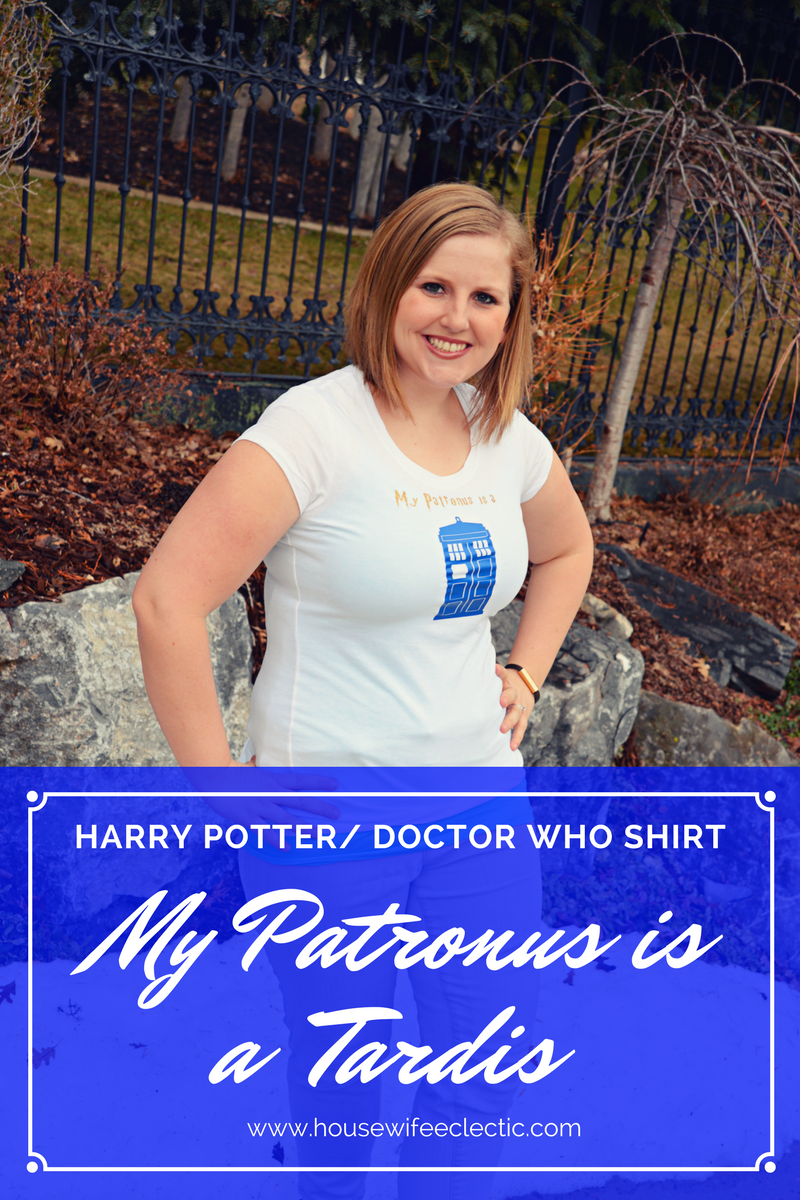
Now to make our Harry Potter shirts. For the My Patronus is a Tardis shirt you will need to upload a simple line image of a Tardis. Download the image below, by right clicking and saving it and then upload it into your Design Space. Then you can resize it and put it where you want it.
Type the words My Patronus is a directly into Design Space. I downloaded the Harry P font from Da Font to get my words to look like the Harry Potter font.
Cutting out of different colors of material
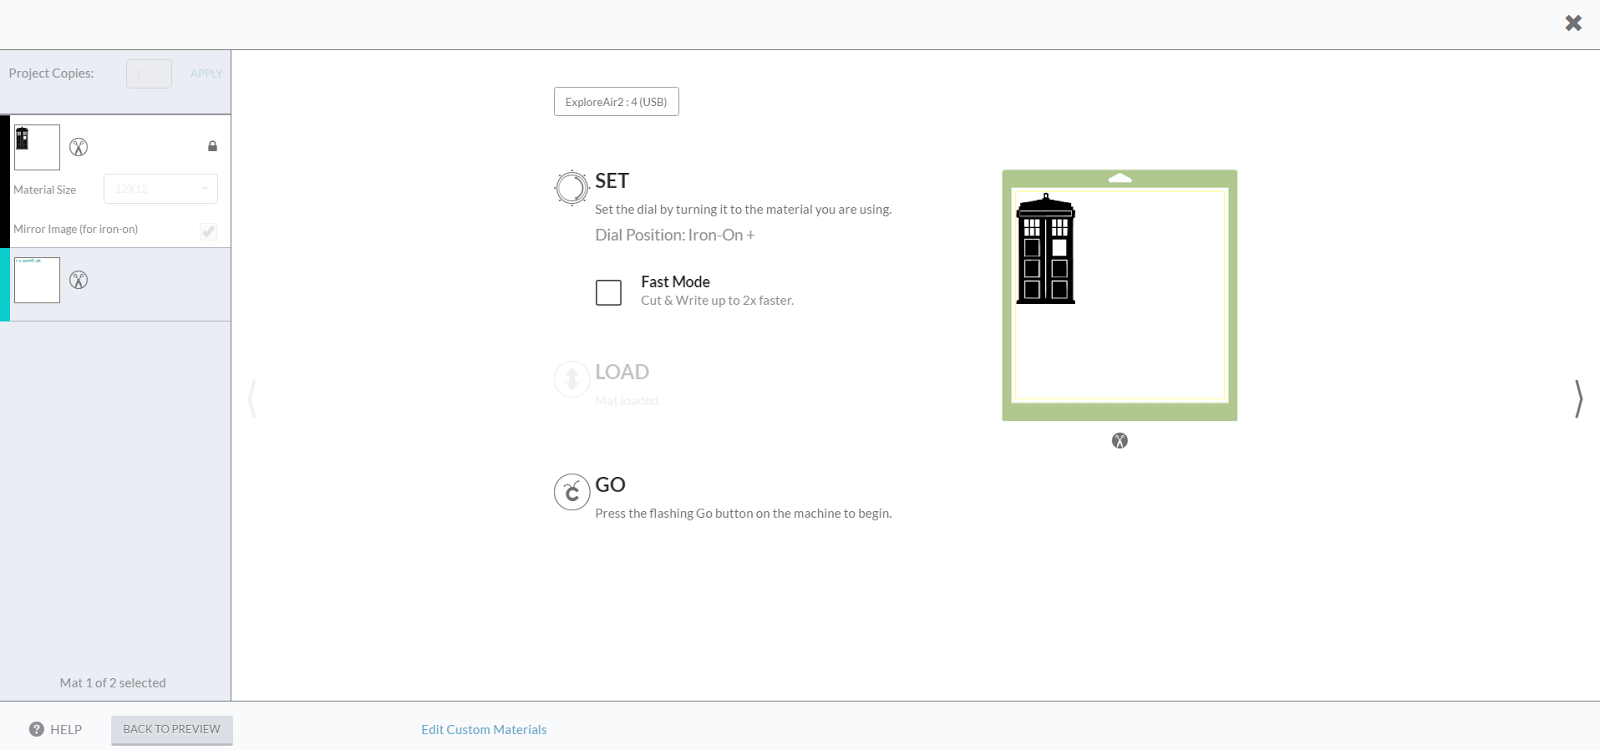
When you have the Tardis and the words looking like you want them, make the words a different color in the program from the Tardis. This will let the machine know that you are going to cut them out of two different colors of heat transfer. Hit the big green GO button at the top of the screen. Make sure to hit Mirror Image (for iron-on) on BOTH of the mats that appear on the left of your screen. So hit the button once on the Tardis mat, then select the mat that holds that words and hit mirror again BEFORE you start cutting. Set the dial on your machine to iron on, load your Cricut mat and hit the flashing go button.
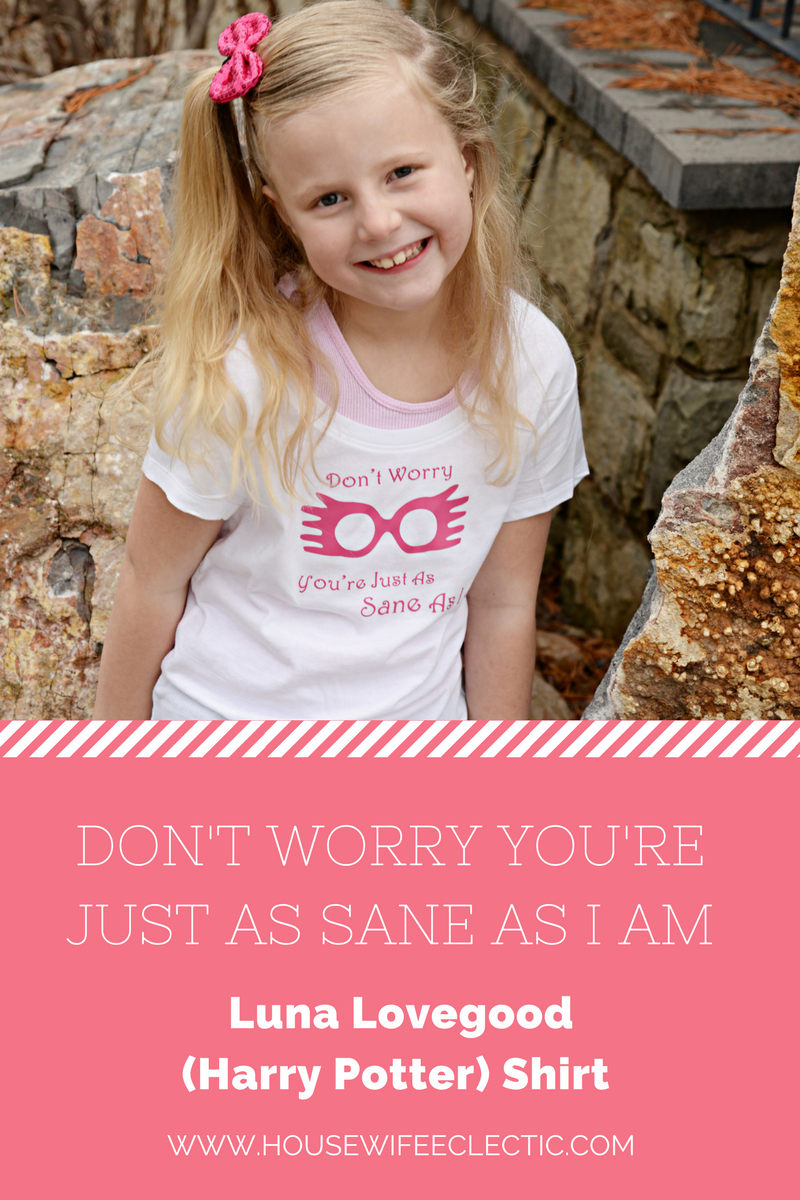
Luna Lovegood Shirt
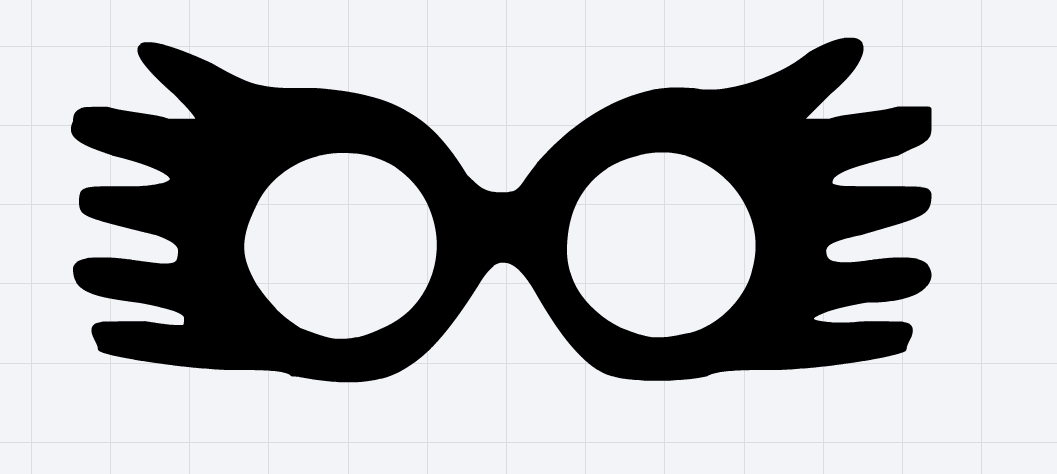
For the Luna Lovegood shirt you will need a serif font as well as the simple outline image of her Spectre Specs. Download the image below, by right clicking and saving it and then upload it into your Design Space. Then you can resize it and put it where you want it.
Making your machine cut the way you laid it out
Your Cricut machine is programmed to save vinyl, which is awesome but can be overwhelming if you are working on your first few projects. If you want the words and the Spectre Specs to cut exactly the way you have laid them out on the screen, select all of the word and images boxes, right click and hit attach. Now when you cut them out they will cut this way exactly. Hit the go button, mirror the image for iron on like we talked about earlier in the post, set your machine dial to vinyl and go. (Find the way to weed and iron your shirts on later in the post)


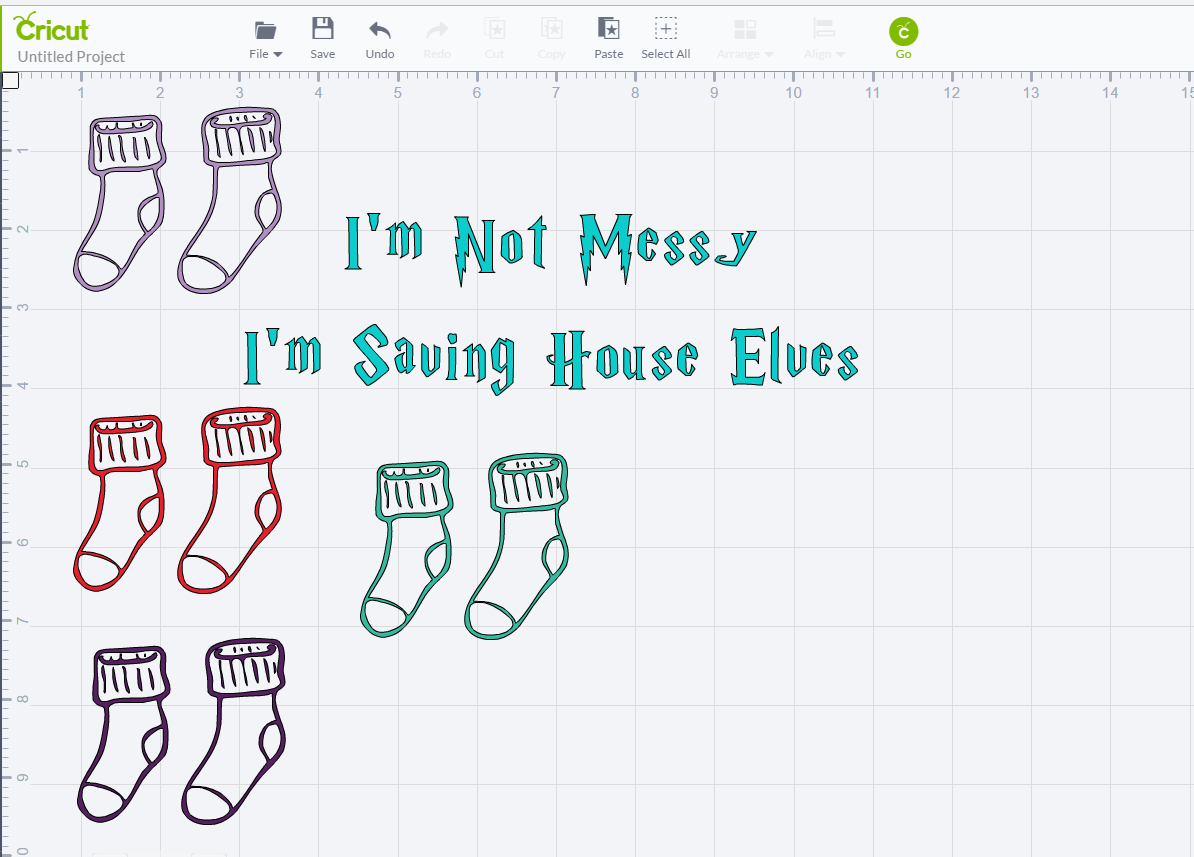
House Elf Shirt

For the House Elf shirt you will need the Harry P font from Da Font again and these cute little socks. Upload the socks into design space, following the procedure in the beginning of the post and type your message into to a text box.
Hit the go button, mirror the image for iron on like we talked about earlier in the post, set your machine dial to vinyl and go.
Weeding off heat transfer and ironing it down
When you have one or any of these three shirts cut, weed off the excess heat transfer by pulling a corner of the heat transfer. Take special care around the dots of I’s and other small items.
Once your heat transfer is weeded, place it down on the shirt like you want it. Set your iron to the cotton setting on your iron (or about 305 degrees) Preheat the area of the shirt you want to place your vinyl for about 3 seconds then place the heat transfer on the blanket with the right side facing up. Using medium pressure, iron the entire image for about 30 seconds, directly onto the carrier sheet, without any steam. After you finish, I like to flip my shirt inside out and iron for another 10 seconds from the back. Peel the carrier sheet off. If any parts of the image pull up when removing the carrier sheet, stop peeling and iron for a few more seconds in that spot.
After the shirts are ironed they are ready to wear immediately! When you wash them, flip them inside out and they will last a long time.
I absolutely love being able to make anything my little girls can dream up and it is so easy too! Which Harry Potter shirt would you make?

DIY Harry Potter Shirts
Instructions
- Uploading your own images
- First hit the big Upload Images button on the left hand menu in Cricut Design Space. The next image will pop up. Hit the Upload Image button on the left.
- After you hit upload image, the browse screen will come up. Hit browse and find the image you want on your computer. This will let you upload any (.jpg, .gif, .png, .bmp, .svg or .dxf). I always search for images that I want to use in future projects and then save them to my computer so I can upload them. Some of the easiest shapes to trace are ones are silhouettes of something (such as a witch hat) or a line drawing.
- After you select the image on your computer, you will be asked to select the image type. There are three different kinds of image types.
- Simple Image– a image with high contrast colors with a monotone background.
- Moderately Complex Image– a image with simple detail and colors with good contrast between subject and background
- Complex Image– images with fine detail, blended colors or low contrast
- A image like the Tardis I uploaded is a simple image because it has clean lines and a black shape on a white background.
- After you select your image type, it is time to clean up the image. There are a few different tools to help you get the image you want.
- Crop– This tool will let you crop out any unwanted portions.
- Select & Erase- This took is like a little magic wand that will select entire sections. For instance if you click on one of those little white boxes on the Tardis, it will delete the entire white box leaving a transparent background.
- Erase– This is like the erasing tool in paint or other programs where you will physically need to draw over every part you want gone.
- In most images, you want to erase the background and make it transparent so the Cricut knows what lines to cut. It is really easy to use the Select & Erase tool with this Tardis image. Select each of the boxes and zoom in to select the white lines as well.
- Next name you image and select what kind of image you want Design Space to save it as. Do you want to be able to print the image or do you want to cut all of the details. We want to be able to cut it all out, so we select Save as a Cut Image. This is also a good place to make sure you image looks the way you want it to cut. The Cricut is going to cut everywhere is there is white, so double check in this stage to make sure you have white lines or boxes every where there should be one.
- After you save your image, Design Space will take you back to the first Insert Image screen, but this time the image you uploaded will be in the library ready for you to insert it. Insert it into your project and now you can move it, resize it and add any text that you may want for your project.
- Now to make our Harry Potter shirts. For the My Patronus is a Tardis shirt you will need to upload a simple line image of a Tardis. Download the image below, by right clicking and saving it and then upload it into your Design Space. Then you can resize it and put it where you want it.
- Type the words My Patronus is a directly into Design Space. I downloaded the Harry P font from Da Font to get my words to look like the Harry Potter font.
- Cutting out of different colors of material
- When you have the Tardis and the words looking like you want them, make the words a different color in the program from the Tardis. This will let the machine know that you are going to cut them out of two different colors of heat transfer. Hit the big green GO button at the top of the screen. Make sure to hit Mirror Image (for iron-on) on BOTH of the mats that appear on the left of your screen. So hit the button once on the Tardis mat, then select the mat that holds that words and hit mirror again BEFORE you start cutting. Set the dial on your machine to iron on, load your Cricut mat and hit the flashing go button.
- Luna Lovegood Shirt
- For the Luna Lovegood shirt you will need a serif font as well as the simple outline image of her Spectre Specs. Download the image below, by right clicking and saving it and then upload it into your Design Space. Then you can resize it and put it where you want it.
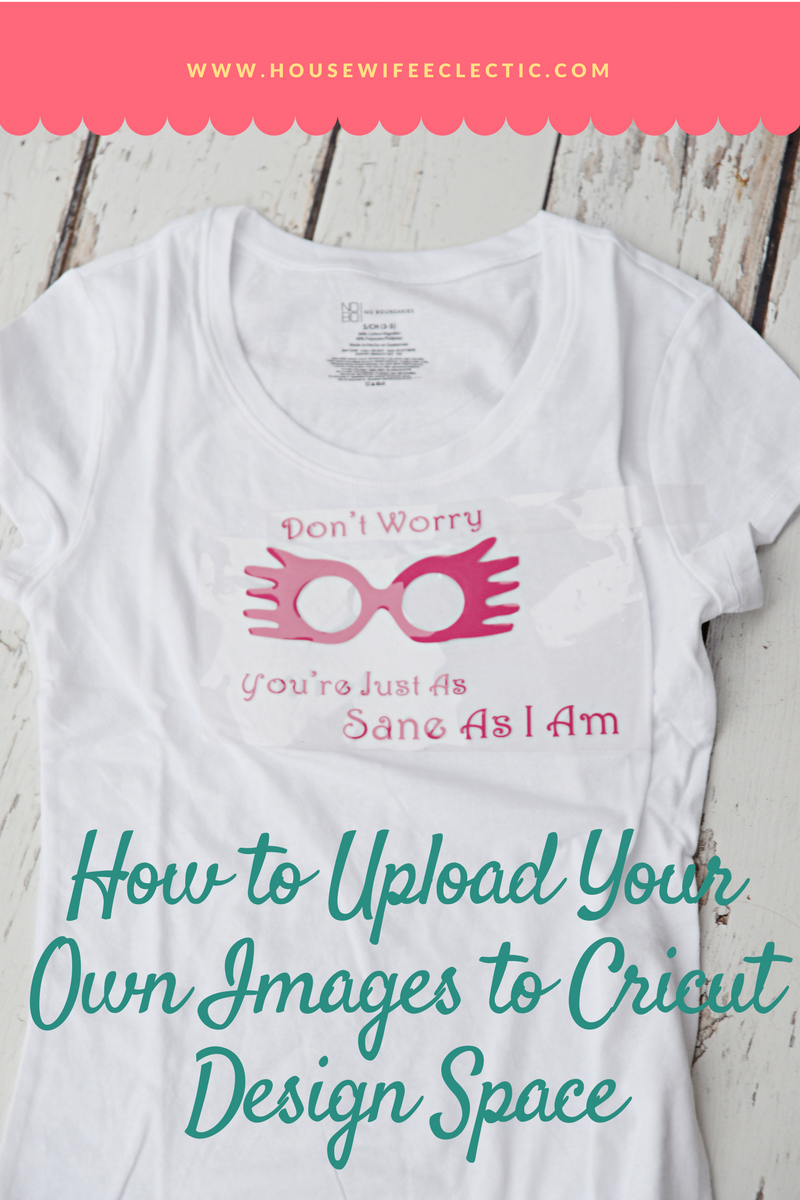
- The words that I put on the Luna shirt with Spectre Specs were “Don’t Worry, You’re Just As Sane As I am.”
- Making your machine cut the way you laid it out
- Your Cricut machine is programmed to save vinyl, which is awesome but can be overwhelming if you are working on your first few projects. If you want the words and the Spectre Specs to cut exactly the way you have laid them out on the screen, select all of the word and images boxes, right click and hit attach. Now when you cut them out they will cut this way exactly. Hit the go button, mirror the image for iron on like we talked about earlier in the post, set your machine dial to vinyl and go. (Find the way to weed and iron your shirts on later in the post)
- House Elf Shirt
- For the House Elf shirt you will need the Harry P font from Da Font again and these cute little socks. Upload the socks into design space, following the procedure in the beginning of the post and type your message into to a text box.
- Hit the go button, mirror the image for iron on like we talked about earlier in the post, set your machine dial to vinyl and go.
- Weeding off heat transfer and ironing it down
- When you have one or any of these three shirts cut, weed off the excess heat transfer by pulling a corner of the heat transfer. Take special care around the dots of I’s and other small items.
- Once your heat transfer is weeded, place it down on the shirt like you want it. Set your iron to the cotton setting on your iron (or about 305 degrees) Preheat the area of the shirt you want to place your vinyl for about 3 seconds then place the heat transfer on the blanket with the right side facing up. Using medium pressure, iron the entire image for about 30 seconds, directly onto the carrier sheet, without any steam. After you finish, I like to flip my shirt inside out and iron for another 10 seconds from the back. Peel the carrier sheet off. If any parts of the image pull up when removing the carrier sheet, stop peeling and iron for a few more seconds in that spot.
- After the shirts are ironed they are ready to wear immediately! When you wash them, flip them inside out and they will last a long time.

This is a sponsored conversation written by me on behalf of Cricut. The opinions and text are all mine.
var ts=document.getElementById(‘ti-pixel-tracker’); var axel = Math.random() + “”; var num = axel * 1000000000000000000; var ti=document.createElement(“img”); ti.style.display=”none”; ti.src=”https://tracking.tapinfluence.com/trk/LxHOq/TaftW/p.png?p=vZPvN” + String.fromCharCode(38) + “i=2s2F6” + String.fromCharCode(38) + “ord=”+ num + String.fromCharCode(38) + “s=” + encodeURIComponent(document.referrer); ts.parentNode.replaceChild(ti,ts); JSON.stringify({“program_id”:”e134007e-e70a-11e6-99ab-22000a7d00a4″,”post_id”:”eb714180-e743-11e6-a105-22000a7d00a4″});
Super cool you are able to upload your own images to create custom t-shirts! I bet this saves a lot of money in the long run!
how awesome! I love your tardis shirt so much! I need to do this for the kids and i soon
You make these DIY projects so simple to follow with your images and directions. I would love to try this out – and the possibilities are endless! How creative!
I've been wanting to do a DIY textile print for a while now and this definitely comes handy. I need to bookmark it for when I'm actually doing it! Thank you for sharing it x
This looks so cool! A fun activity for kids, and how cool to be able to design your own shirt!
I love Harry Potter so much, and it's so awesome that you've designed these shirts!
This looks so adorable and pretty easy to do! I bet my children would love these.
You make it sound easy, but I think it requires talent! Nice work, and I know my neighbor kids would love these.
Oh I can think of so many uses for this tutorial on making shirts! Definitely looking into getting a cricut. I think I have the old craft robo that might work in the garage! Weekend jobs!
These are just the absolute cutest! I don't have a cricut but I'm always seeing awesome crafts to do with them!
These are seriously so cute! I have heard of the Cricut before but it looks like the possibilities are endless.
these are so cute! I really love the luna lovegood one as she is my favorite character!
These look so fun! Perfect for any Harry Potter fan! I have really wanted to get a cricut but haven't gotten one yet. This would be fun to do!
I just love these designs! So cute! And once again I am so envious of anyone who ones a cricut!!
What a great tutorial! I bet my boys would love some custom shirts!
These are so cute!I've always wondered how well these work because I've wanted to buy one in the craft store.
Omg how cute are these shirts?!?! I love making custom shirts. I make them all the time
These are so cute! The Harry Potter ones would be great for a trip to Universal studios!
This is such a cool idea! A lot of my friends would love to make their own Harry Potter t-shirt
So cool!! I want a cricut so bad lol, but I have so many more things on my list before I can get that to make my own monogram items.
These shirts are so cute and very creative. I bet you get lots of questions about where you bought them.
How cute and how much fun for the kids. Love the elf one! While I don't know anything about Harry Potter, my boyfriends kids do!
This DIY is so cute! I love everything Harry Potter, I might have to check this out for myself.
These are so cute! I have been thinking about throwing a Harry Potter party for my kids. These would be so fun to make for all the kids that come!
I -just- got a Cricut on Friday! I am SO excited! And you answered a question I had — how to change an image I imported to a cut image. This was amazingly helpful. Thank you!
I have a Silhouette machine collecting dust in my office. I think I need the new Cricut. Love the shirts and Harry Potter! Too cute.