
There is nothing worse than forgetting it is St. Patrick’s Day and showing up to school without any green on. It happened to me once in elementary school and I may go over board every year to make sure it doesn’t happen to my girls. These super cute and easy outfits are made from dollar store elements and a fun DIY shirt. I am thrilled with how their outfits turned out and they cost under 5 bucks each. WAY better than what I spent last year.

Glitter Shamrock Shirts
For this project you will need:
- a blank white shirt
- Green Glitter heat transfer
- Gold Glitter transfer
- a Cricut
- Cricut EasyPress or Iron
- Cricut Brightpad

You can find my design files here. If you want to make the design as is, simply hit Make It, if you want to customize, which includes resizing, hit customize.

After you hit make it, your mats will appear. There should be too mats, one that will be cut out in green glitter heat transfer and the other that will be printed in gold heat transfer.

Make sure you hit mirror on BOTH mats before your start cutting. This is found on the left hand side under material size.

Hit continue and select the material type. Be sure to select glitter iron-on, not just iron-on as glitter is generally thicker.

Place your material on your cutting mat, shiny side down and load it into the machine. Make sure you have a fine point blade loaded and then hit the flashing Cricut symbol.
You May Also Like: Chillin’ With My Peeps Shirt

Peel the material from the mat and make the second cut. You will cut all of the green iron-on first and then gold iron-on second.

Peel the heat transfer off of your mat and then weed (peel apart) the heat transfer until just your design remains on the sticky backing. This is where you use the Cricut BrightPad to help you see any cut lines and weed the project properly. Cut apart the letters, so you can place them on the shirt separately.
Add the first layer of iron-on (all of the green letters and the gold shamrock) face down on your shirt. You will be able to see through the plastic backing so you can put your project together just the way you want it. Just make sure that none of the letters or images are touching the plastic backing of another element or it will fuse to that instead of the shirt. Heat your iron up to the hottest setting or you EasyPress to 305 degrees. Iron straight onto the plastic, making sure each element of the design gets 30 seconds of pressure and hit. Start pulling up the plastic backing and if any of the elements pull up at all, put the plastic back down and iron that area again. Add the green shamrock on top of the gold shamrock, so it is where you want it to be, put parchment paper over the entire design and iron again. Peel the plastic off.
You May Also Like: DIY Harry Potter Shirts
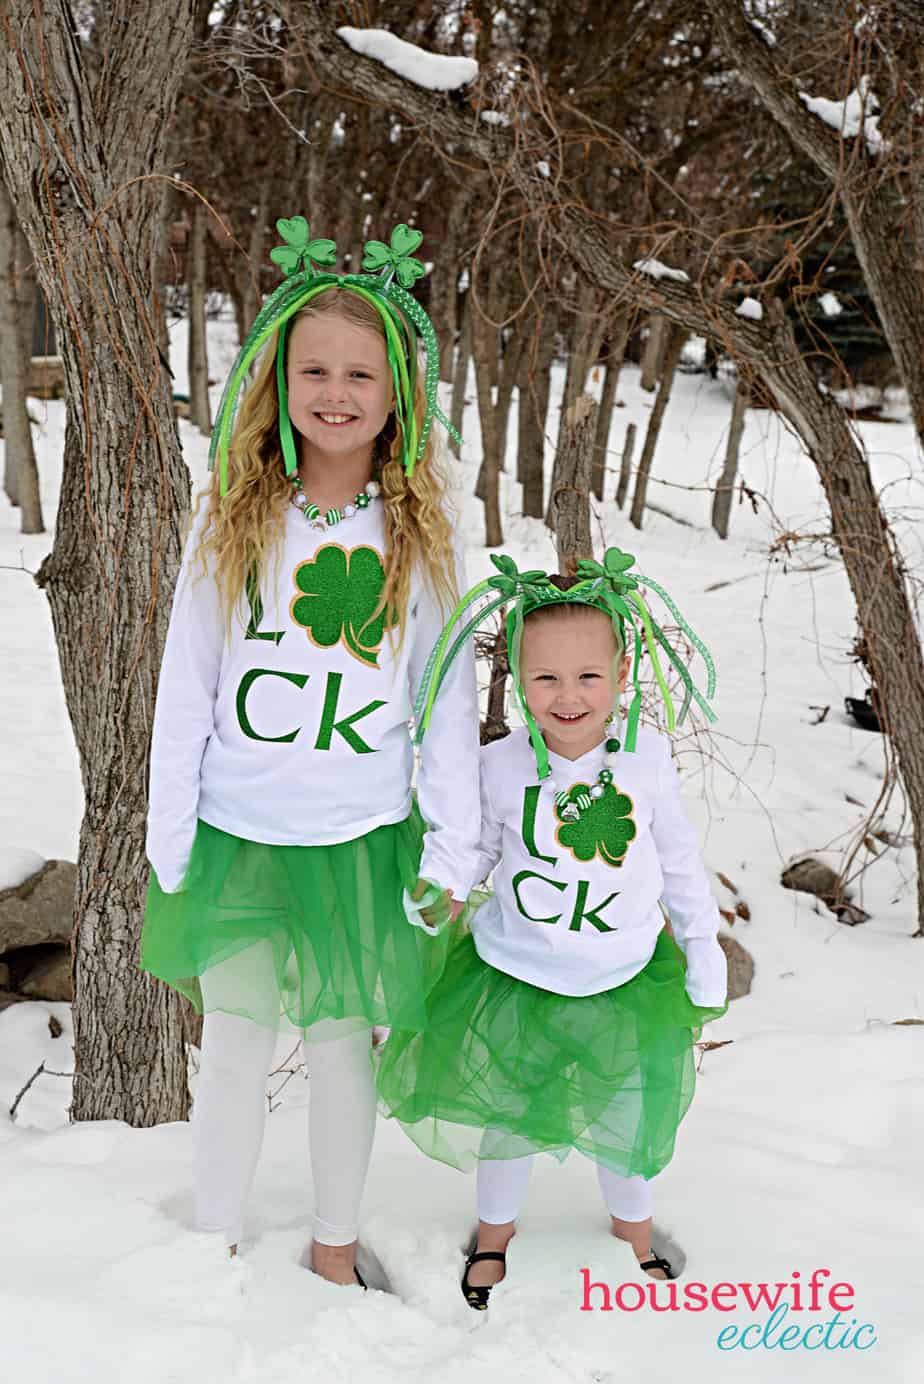
We paired the shirt with these fun accessories for the dollar store. These kids are going to be pinch proof for sure!
What do you wear on St. Patrick’s Day?
Well now time to get out my cricket and start creating something fun for St. Patrick Day. Bet the kids love wear these to school.
These shirt came out great! I love how simple this project is, even craft-challenged people like me could do it!
These are such great shirts! My daughter is actually having her birthday party on St. Patrick’s Day and won’t be wearing green. Ack! She has a party outfit planned already–so I think she said she’d draw a smiley face on her hand in green marker in case someone tried to pinch her.
How cute. I was excited that this year it is on a Saturday so I can not leave my house and wear anything I want. lol
Those shirts are adorable!! As well as the girls in them! But you used a four-leaf clover, not a shamrock. A shamrock only has 3 leaves. It’s a common mistake! My hubby is from Ireland so he’s always pointing that out to me, lol.
No pinching here. I have the cutest t-shirt I picked up from Old Navy and my Lucky Girl socks that I’m wearing next Saturday on St. Patrick’s Day. My kid is marching in the St. Patrick’s Day parade so I wanted to be decked out in some green.
Those are incredibly cute and so fun for St. Patrick’s Day. I wish I had the material and the machine to be able to make stuff like this because it would be fun to make. You are extremely creative and I bet the girls love the outfits they have.
Your girls are super cute! Love the shirts and the headbands. They definitely won’t get pinched on St. Paddy’s day!
Wow! I think you did an amazing job with the shirts!!! The whole outfit is perfect for celebrating St. Patrick’s day! Love every single detail.
These are seriously so cute! I’ve seen a lot of St. Patrick’s day stuff lately, but this is the cutest!
Oh my gosh, those are the cutest shirts ever! I would love matching ones with my kids!
These came out great! Perfect festive outfits and seemed somewhat simple to make on your own too.
They turned out really cute. Growing up I always made sure to wear green. I never wanted to get pinched.
Ohh this is a great idea! Personalising your shirts is indeed a cool one. This can also be applicable if your want to have a unique design. We can also be more creative in thinking of what to put in out own shirt.
These shirts are TOO cute! I am not a crafty Mom but I think I could make a shirt for my daughter. THanks for sharing these adorable tops.
What a cute idea! We don’t celebrate St. Patricks Day yet I still find myself scrambling every year to find the girls something green. No one likes to get pinched.
You are so creative and I love how you paired the shirt that you made with cute green skirts and hair accessories. This will make them stand out on St. Patty’s day! Love it!
Wow! you have worked magic, the dresses with the accessories are so cute. The kids look lovely in the outfit and so appropriately dressed for St. Patrick’s Day.