When I was a child, my mom used to make me yarn dolls to play with. Dolls in all styles and colors. They were some of my favorite toys. Even as much as I played with them as child, I had forgotten about them when I became a mom. This last week, my mom pulled out her skeins of yarn and accessories and taught my girls the joy of making and playing with yarn dolls. These little dolls have gone everywhere my girls have in the last week and I have completely rediscovered the joy of playing with something handmade. We have made about 10 dolls in the last week, everything from basic yarn dolls to Dolls resembling the characters from Frozen.

How to Make Yarn Dolls
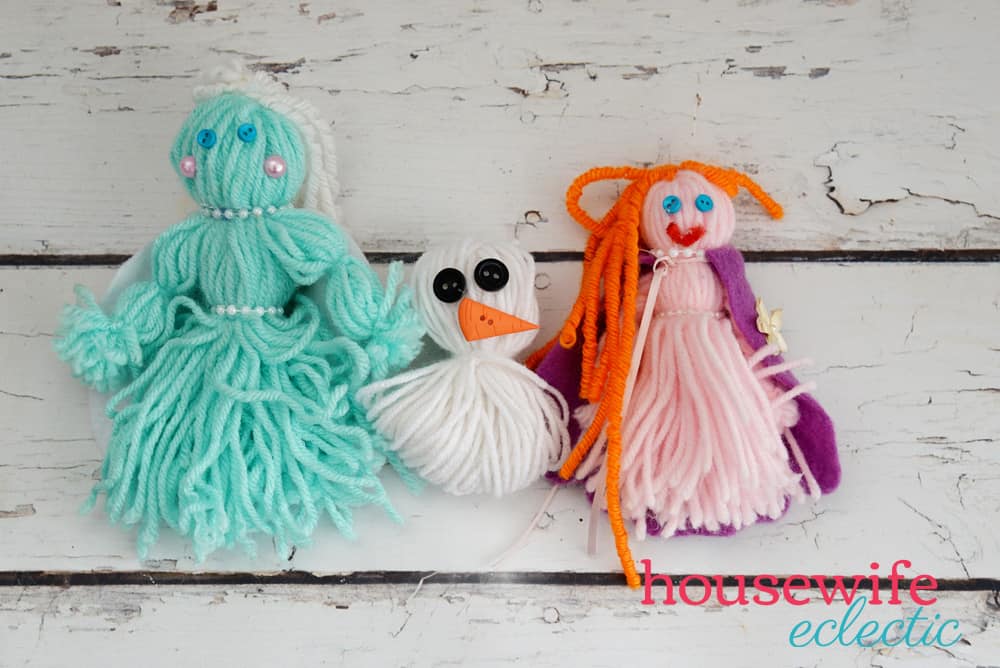
Below find the step-by-step picture instructions for making a basic yarn doll and also separate instructions for how to make Elsa, Anna and Olaf dolls.

How To Make a Yarn Doll
You will need:
- Yarn in any color
- Scissors
- A hard back book
- buttons for eyes
- felt and other add ons

Your doll will be about the same size of the hardback book you use so find a book the size you would like you doll. Wrap the yarn fairly tightly around the book between 30 and 40 times.

Tale a long length of string and slide it under the group of strings around the book.

Slide the string up to the top of the book and tie it tight.

Slide the yarn off of the book.

Gather one side of the loops in your hand and cinch it a couple inches from the top. This will be the head of your doll.

Take a small piece of string and tie it where your hand is tight.

Cut the loops at the opposite end of the yarn doll head.

Take a small section of yarn from each side of the yarn doll. These will be the doll’s arms.

For the arms, you can either tie them at the elbow and the wrist of each arm or you can braid each arm and then tie them off with a small piece of string.

Tie the doll with a piece of string at the waist. If you want to change the doll from having a skirt to having pant, split the strings below the waist string into half. Tie each of the halves, halfway at the knees and then each at the ankles too.

My girls still have Frozen Fever around here, so we made a set of fun Frozen yarn dolls for them to enjoy. You can find the instructions for each individual doll below.

Anna Doll
You well need:
- Pink Yarn
- Orange Yarn
- A Knitting Needle
- Purple felt Blue buttons
- Pearl Trim
Wrap the orange yarn around the bamboo skewer. Spray it down with water and bake on a cookie sheet 30-45 minutes at 200 degrees until the yarn is dry. This will set the yarn to make it curly. Peel the yarn from the skewer. Make the doll just as the tutorial above shows. Hot glue the strands of orange hair to the head, add the blue buttons for the eyes. Add the pearl bead trim around the neck and waist of the doll. Make a cape out of the Purple felt by cutting a rectangle the length of the doll from the neck to the end of the dress strings. Round the bottom edge of the cape and then hot glue it to the neck of the doll. Embellish the cape with flowers.

Elsa Doll
You will need:
- Light Blue Yarn
- A Knitting Needle
- White Felt
- White Yarn
- Pearl Bead Trim
- Round Pink Buttons
- Blue Buttons
- Snowflake buttons
Wrap the white yarn around the bamboo skewer. Spray it down with water and bake on a cookie sheet 30-45 minutes at 200 degrees until the yarn is dry. This will set the yarn to make it curly. Peel the yarn from the skewer. Make the doll just as the tutorial above shows. Hot glue the strands of white hair to the head, add the blue buttons for the eyes and the pink buttons for the cheeks. Add the pearl bead trim around the neck and waist of the doll. Make a cape out of the white felt by cutting a rectangle the length of the doll from the neck to the end of the dress strings. Round the bottom edge of the cape and then hot glue it to the neck of the doll. Embellish the cape with snowflakes.

Olaf Doll
You will need:
- White Yarn
- Black Buttons
- Carrot Button
- Hot Glue
Find a small hardback book to make Olaf. I used a mini board book from a Chick-Fil-A kids meal. Wrap the yarn around the book about 20-30 times. Tie the yarn and then slide it off. Tie off a head, but do not cut the bottom strings. Hot glue the buttons to the face.

How To Make a Yarn Doll
Materials
- Yarn in any color
- Scissors
- A hard back book
- buttons for eyes
- felt and other add ons
Anna Doll
- Pink Yarn
- Orange Yarn
- A Knitting Needle
- Purple felt Blue buttons
- Pearl Trim
Elsa Doll
- Light Blue Yarn
- A Knitting Needle
- White Felt
- White Yarn
- Pearl Bead Trim
- Round Pink Buttons
- Blue Buttons
- Snowflake buttons
Olaf Doll
- White Yarn
- Black Buttons
- Carrot Button
- Hot Glue
Instructions
- Your doll will be about the same size of the hardback book you use so find a book the size you would like you doll. Wrap the yarn fairly tightly around the book between 30 and 40 times.
- Tale a long length of string and slide it under the group of strings around the book.
- Slide the string up to the top of the book and tie it tight.
- Slide the yarn off of the book.
- Gather one side of the loops in your hand and cinch it a couple inches from the top. This will be the head of your doll.
- Take a small piece of string and tie it where your hand is tight.
- Cut the loops at the opposite end of the yarn doll head.
- Take a small section of yarn from each side of the yarn doll. These will be the doll's arms.
- For the arms, you can either tie them at the elbow and the wrist of each arm or you can braid each arm and then tie them off with a small piece of string.
- Tie the doll with a piece of string at the waist. If you want to change the doll from having a skirt to having pant, split the strings below the waist string into half. Tie each of the halves, halfway at the knees and then each at the ankles too.
- My girls still have Frozen Fever around here, so we made a set of fun Frozen yarn dolls for them to enjoy. You can find the instructions for each individual doll below.
Anna Doll
- Wrap the orange yarn around the bamboo skewer.
- Spray it down with water and bake on a cookie sheet 30-45 minutes at 200 degrees until the yarn is dry. This will set the yarn to make it curly.
- Peel the yarn from the skewer.
- Make the doll just as the tutorial above shows.
- Hot glue the strands of orange hair to the head, add the blue buttons for the eyes.
- Add the pearl bead trim around the neck and waist of the doll.
- Make a cape out of the Purple felt by cutting a rectangle the length of the doll from the neck to the end of the dress strings.
- Round the bottom edge of the cape and then hot glue it to the neck of the doll.
- Embellish the cape with flowers.
Elsa Doll
- Wrap the white yarn around the bamboo skewer.
- Spray it down with water and bake on a cookie sheet 30-45 minutes at 200 degrees until the yarn is dry. This will set the yarn to make it curly.
- Peel the yarn from the skewer.
- Make the doll just as the tutorial above shows.
- Hot glue the strands of white hair to the head, add the blue buttons for the eyes and the pink buttons for the cheeks.
- Add the pearl bead trim around the neck and waist of the doll.
- Make a cape out of the white felt by cutting a rectangle the length of the doll from the neck to the end of the dress strings.
- Round the bottom edge of the cape and then hot glue it to the neck of the doll.
- Embellish the cape with snowflakes.
Olaf Doll
- Find a small hardback book to make Olaf. I used a mini board book from a Chick-Fil-A kids meal.
- Wrap the yarn around the book about 20-30 times.
- Tie the yarn and then slide it off.
- Tie off a head, but do not cut the bottom strings.
- Hot glue the buttons to the face.
Video
What kind of doll will you make?
I think this is a project that the kids can make with you as well. It’s really fun and you can customize the doll depending on what you want to make!
I could really make dolls like these with my nieces! I’m pretty sure they’re going to love it. It’s not so complicated either! The dolls look so pretty!
Well if you didn’t bring back some childhood memories. We use to make these all the time when I was little. Always received the leftoves scraps of yarn. There was some interesting yarn dolls made.
These are cute! I’ll have to show my daughter this post. She might try to make one.
So cute and easy. This would be a great project for girl scouts. I remember making toys to earn a badge forever ago.
Wonderful diy craft project! I’m sure little girls will love these! When I was a kid our neighbor used to make some incredible looking yarn dolls and sell them at craft shows and various fairs.
This is something that will keep the kids engrossed and happy for a long time. The dolls look so cute too. The kids are gonna love this activity.
These are so simple and turned out so cute. MY favorite of them is the Olaf yarn doll though. He’s adorable.
I remember making these as a girl. I totally forgot about them too, but this is such a creative idea.
I remember my mom having some of these. They are so cute. But I had no idea they were so easy to make.
Those are cute. I’ve never seen anything like them before. I really like how simple they are to make!
This would be a nice project to start with a group. I am thinking we can make a lot of these yarn dolls to give away to the homeless kids this Christmas. I am sure they will appreciate it.
I remember making and playing with dolls like this when I was young. What a sweet memory to bring back, thank you!
These yarn dolls are so cute and easy to make. I bet my kids would love to make some of these for themselves. Gotta show this to them.
Such a fun art and craft project this is and it looks very easy to make, thanks to your tutorial. I think my daughter would love to make one of these.
Awe these are so cute! Frozen is one of my daughters favorites!
Oh I would love to make these! Lord knows I have the yarn to do so!
Oh my daughter would love to make these! They look so easy to make!
Oh how cute are these! My girls would love to do these and they could make them on their own! How fun!