IKEA Hack
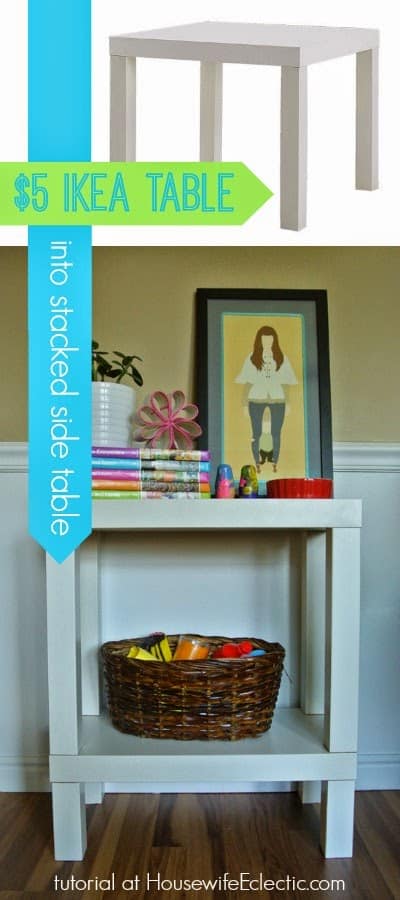
We recently rearranged our master bedroom and needed new bedside tables. I wanted something simple and inexpensive. When I saw this simple stack-a-Lack tutorial, it was perfect — especially since the Lack tables are an IKEA Family special this month for only $5 a pop!
I only wanted my tables to be half the size (11″ deep by 22″wide instead of the full 22″ square), so I figured I could dive in and be brave enough to cut a $5 table in half. And a little bit of Googling confirmed that many a DIYer had hacked up IKEA tables, so I was sure I could make it work. And, surprise, it actually did! That, like, never happens 😉

Here’s how to make your own set of side tables — perfect for a bedside table or a small decorative table. Just enough surface space for a few books, a catch-all for jewelry and keys, and a photo, and toss a basket underneath for some extra storage. I photographed mine in my front room and I kind of love it there so maybe I’ll need to go back for more $5 tables to cut up…

IKEA Lack into Stacked Side Table
To make TWO stacked side tables* you will need:
- 3 LACK tables*
- a saw of some sort — and safety gear, and safety sense (I used a circular saw — it just needs to be able to cleanly cut 2 inches deep. If you’re steady and trust yourself, you could probably use hand saw or even a craft knife or box cutter — the tables are just made out of reinforced cardboard with a little bit of plywood)
- wood glue
- your preferred measuring and marking tools
MEASURE AND CUT THE TABLE TOPS AND LEGS

Measure to the center of each tabletop and mark. LACK tables are not exactly 22 inches square. They are 21-5/8 inches. So test out your fraction and measurement skills! My center markings were at 10-13/16 inches.
Once you’ve measured twice and taped along your cut lines, get to cutting! My father-in-law is the man with the tools, so he helped me get it all set up and cut, and he taught me a cool trick for getting a nice straight cut line even when you’re using a simple circular saw:

You just set up the saw with the blade along your cut line and then you use a long, straight piece of lumber (or in our case, leftover trim) and butt it up against the edge of the saw’s edge/guard, double check that it’s straight, and then clamp it. That gives you something to help guide the saw through the full cut smoothly and straight, which is perfect for a small wimpy thing like me!

ASSEMBLE AND STACK
Note: My table is always going to be facing a wall, so I opted not to worry about making the cut side of the table pretty. If you want yours to be fit for 360-degree viewing, now would be the time to fix that.
To start, you will make 4 mini tables (2 if you are only making one table) — 2 with tall original-length legs, and 2 with the cut short legs. The original corners of the table have small reinforced squares to screw the legs into, so use those corners to start assembling. You just screw the double-ended screw that came with the table, called a dowel screw, into the table, and then twist the table leg on. (This will only work for the full-length legs and the cut legs that have the thicker reinforced section — the bottoms of the original legs are reinforced, but the particle wood section is only about half an inch thick, so the screws don’t have anything to grab on to.)
For the other legs, I hemmed and hawed and debated and ended up using wood glue (just plain ol Elmer’s wood glue) and it worked wonderfully! I held each leg in place for 30-60 seconds, and then it was set up enough to hold on its own while I moved on to the other legs.
I used my spare table top to help clamp the shorter legs while the glue dried (by laying it on top of the legs and then clamping it — sorry, my cranky baby prevented the picture taking!) and then just let gravity hold the longer glued-on legs, since I didn’t have clamps that large.
Give the glue time to dry, and then you can stack and glue the table with the longer legs on top of the table with the shorter legs to create your stacked end table! I used my beloved Childcraft books as the weight to hold the tables together firmly, and then kept them for the photos 🙂
And, for those of you wondering what the inside of the table looks like… it really is just cardboard with a little particle board!

IKEA Hack $5 Side Table
Materials
- 3 LACK tables*
- a saw of some sort — and safety gear and safety sense (I used a circular saw — it just needs to be able to cleanly cut 2 inches deep. If you’re steady and trust yourself, you could probably use hand saw or even a craft knife or box cutter — the tables are just made out of reinforced cardboard with a little bit of plywood)
- wood glue
- your preferred measuring and marking tools
Instructions
MEASURE AND CUT THE TABLE TOPS AND LEGS
- Remember to measure twice, cut once!
- Measure to the center of each tabletop and mark. LACK tables are not exactly 22 inches square. They are 21-5/8 inches. So test out your fraction and measurement skills! My center markings were at 10-13/16 inches.
- For the legs, you’ll just need to cut one set of legs into two shorter sets for the lower set of legs on each side table. Based on the height of my bed, I wanted to add 6 inches in height to the table, so I taped the set of 4 legs together and marked 6 inches in from each end. The legs are hollow but reinforced with a plywood plug at each end, which you’ll need for screwing or gluing the table together.
- As you calculate your desired table height, keep in mind that you’ll have two 2″ tabletops in the mix as well, plus the original LACK legs are just shy of 16″ tall. So, calculate the lower leg height you’ll need by subtracting 20″ from the total height that you want the table to be, and then round up if you’re a perfectionist. I made the lower legs 6″ tall which makes my table just shy of 26″ total height.
- Once you’ve measured twice and taped along your cut lines, get to cutting! My father-in-law is the man with the tools, so he helped me get it all set up and cut, and he taught me a cool trick for getting a nice straight cut line even when you’re using a simple circular saw:
- You just set up the saw with the blade along your cut line and then you use a long, straight piece of lumber (or in our case, leftover trim) and butt it up against the edge of the saw’s edge/guard, double check that it’s straight, and then clamp it. That gives you something to help guide the saw through the full cut smoothly and straight, which is perfect for a small wimpy thing like me!
- Once you’ve made all of your cuts, you should have these pieces for EACH table:
ASSEMBLE AND STACK
- Note: My table is always going to be facing a wall, so I opted not to worry about making the cut side of the table pretty. If you want yours to be fit for 360-degree viewing, now would be the time to fix that.
- To start, you will make 4 mini tables (2 if you are only making one table) — 2 with tall original-length legs, and 2 with the cut short legs. The original corners of the table have small reinforced squares to screw the legs into, so use those corners to start assembling. You just screw the double-ended screw that came with the table, called a dowel screw, into the table, and then twist the table leg on. (This will only work for the full-length legs and the cut legs that have the thicker reinforced section — the bottoms of the original legs are reinforced, but the particle wood section is only about half an inch thick, so the screws don’t have anything to grab on to.)
- For the other legs, I hemmed and hawed and debated and ended up using wood glue (just plain ol Elmer’s wood glue) and it worked wonderfully! I held each leg in place for 30-60 seconds, and then it was set up enough to hold on its own while I moved on to the other legs.
- I used my spare table top to help clamp the shorter legs while the glue dried (by laying it on top of the legs and then clamping it — sorry, my cranky baby prevented the picture taking!) and then just let gravity hold the longer glued-on legs, since I didn’t have clamps that large.
- Give the glue time to dry, and then you can stack and glue the table with the longer legs on top of the table with the shorter legs to create your stacked end table!

So, now I’m all fired up and ready to cut apart all sorts of furniture. I’ve got my eye on my old sewing desk, since I also picked up a new sewing table at IKEA while I was there… so I’ve got nothing to lose!

Thanks again for having me, Debra!
Lu (or Lorene if you prefer) is the mom of 3 kids and wife of a singing and dancing elementary teacher. She happily shows up here at Housewife Eclectic whenever Debra allows, and occasionally blogs on whatever topic comes up over at her blog, just Lu, when she has time in between projects and her awesome job as a virtual assistant.
I absolutely love seeing these Hacks. I can't wait to see what you do next! This stacked end table is a really great idea.
Thanks, Stacey! I really love it, and it was a simple and cheap way to get what I wanted — 2 bedside tables for $15! 🙂
That is so creative and so useful. Looks like it turned into a great table.
Such a cute idea. It came out really nice too. Perfect for a small space.
Wow, what a great way to add a little something to your everyday decor! And, cheap!
Love this ikea hack! It looks great!!
Such a cute idea. I love how easy it is
What an awesome hack – I never would have guessed it wasnt meant to be that way.