Have you entered the $50 CSN giftcard giveaway? Go here!!
This may sound like blasphemy from a photographer, but Photoshop is not the only photo editing software out there. Gasp. I know, I said it. I will probably be stoned by the Photoshop-Only-For-Photographers-Council. As great as Photoshop is, let’s face it, it’s expensive. Sure, it can pay off if you are a professional photographer or if you really get into your photos. But, for most people, the price tag is a little too hefty and the learning curve too high to make it truly worthwhile.
In my many Photo Thursday postings, I’ve received many comments from people who don’t use Photoshop. Have no fear, I have a solution for you. The best part? It won’t cost you a dime!
Welcome to PIXLR (http://pixlr.com/editor). This online photo editing software is like the younger brother of Photoshop, though it is in no way related to Photoshop. The interface will feel very much like Photoshop, so longtime Photoshop users will feel right at home and beginners will also feel comfortable.
The great thing about PIXLR, besides it being free, is how powerful it truly is. You can upload photos from your computer, create new photos or instantly import a photo from another website. This makes editing super quick.
My husband is a huge fan of PIXLR, and uses it with his web design students at school. The kids have picked up on it fast and really seem to like it.
WARNING: This may be a personal bias, but PIXLR seems to work better on Firefox or Chrome. Just saying…
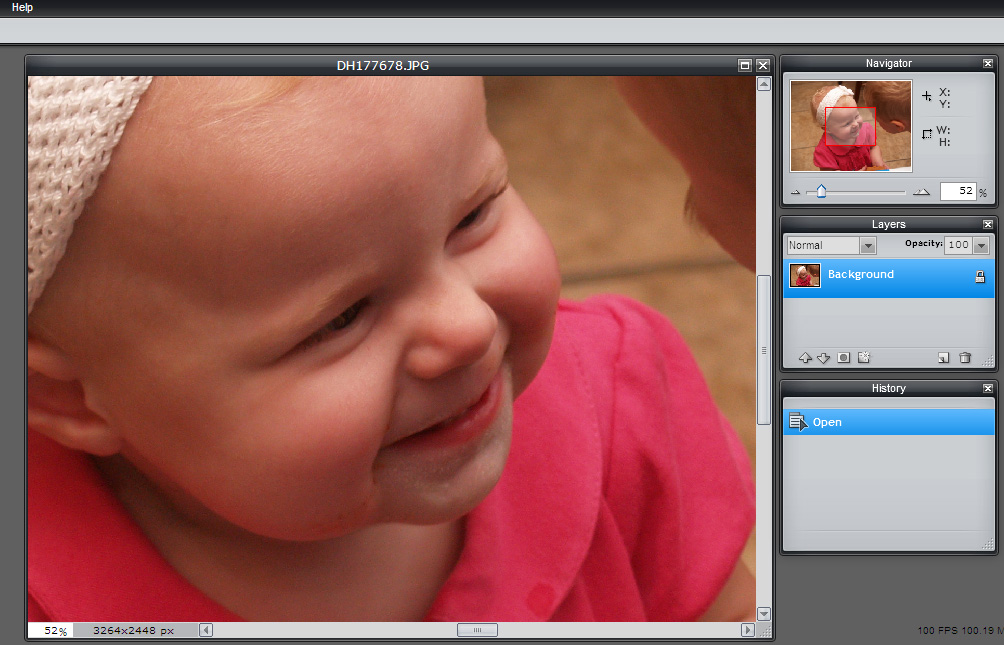
Let’s start by editing a picture from your computer. On the PIXLR splashsreen, press the “Open image from computer” option. This will allow you to find and open the picture you desire.

Now you’re ready to work. In the bottom of your photo window, it tells you the picture dimensions and at what percent you are viewing the picture. If you want to zoom in, find the Navigator pallete on the right side of the screen and slide the bar to the right. By grabbing the red box within the Navigator, you can move your position on the photo.
Like Photoshop, PIXLR takes advantage of Layers. Since this is a new concept to many people, let me explain. The idea of layers is kind of like taking multiple sheets of vellum (thin paper) and stacking them on top of each other. Each sheet of paper has its own part of a drawing and when stacked, they create a complete picture. The advantage of this is it is easy to remove one of the layers without effecting the rest of the picture.
When you open a picture, you are automatically on the Background layer. There is only one layer. You can add more layers as you need.
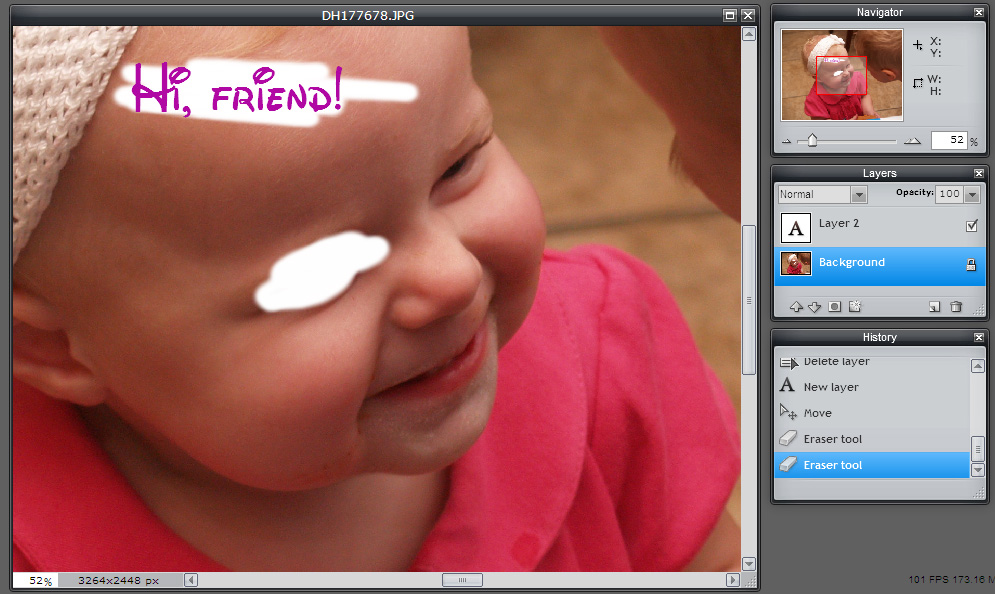
To quickly illustrate this, let’s grab the Text tool from the toolbar on the left side of the screen. This tool is represented by a capital A. Now, click on your photo where you would like to add some text. This brings up a text box where you can type your message and customize the font, size and color. Press OK to finish. If you ever want to go back and edit the text, just select the Text tool again and click on the typing. However, you must make sure you are on that text layer to select.
Here’s what I mean. Look back to the Layers pallete. You will notice you still have the Background layer, but you also have a layer called ‘Layer 2’ on top of the Background layer. This new layer is represented by a capital A. This tells you this layer is text. You can rename this layer, for ease of remembering, by double-clicking on the words ‘Layer 2,’ and renaming it to something easier to remember.
The position of the layers is extremely important. Layer 2 is on top of the Background layer. This is like having a piece of paper with typing on it on top of a photo. You cannot do anything to that photo unless you first remove the top piece of paper. Grab the eraser tool (it looks like a school eraser) from the toolbar and try to erase part of your picture. PIXLR won’t let you, because you are still on Layer 2. To erase part of the picture (don’t worry, we’ll bring it back), go to the Layers pallete and click on the Background layer. Now, erase what you want. Notice I erased over the words, but the words didn’t appear, just what was underneath the words. This is because I was erasing the Background layer, not Layer 2, which holds the text.
This is just great, but now you’ve erased part of your picture. Unless you really like it like that, you probably want it back. This involves the History pallete, below the Layers pallete. The History pallete records every action you perform. This means, you can go back as many steps as you want by clicking on the step above the step that’s highlighted. This is how to undo any mistake you may make.

Now, you’re ready to save your picture. Go to the File menu and select ‘Save…’ This brings up a dialogue box with multiple saving options. Name the file what you desire. Next, select which format you want to use to save the file. Unless you’re really into alternative file types or are a web designer, JPEG will work just great for you. However, there is a drawback from saving a file in JPEG. Once you save this picture, you can never go back and edit the text. When you save, it flattens the layers, which means they all merge into one layer.

Let’s say you’re not finished with your project, but you want to save it and come back to it later. Select the PXD format. This is a special format unique to PIXLR that will save the layers, allowing you to come back to it later and edit each layer individually.
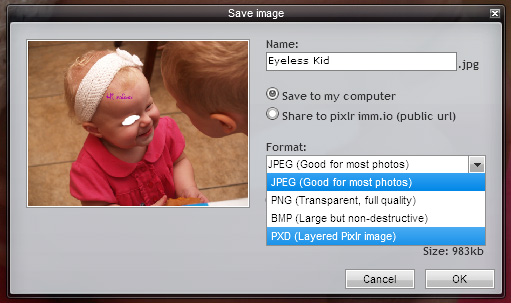
There is one last thing about saving that I feel I must warn you, and that has to deal with the quality. By default, it is set to 80 percent of the photo’s original resolution. You probably don’t want to lose any quality, so slide the bar from 80 to 100, and your photo will be just great.
PIXLR is an incredibly powerful program. If you find it useful, you may consider donating to the company, which is incredibly gracious to provide all this for free.
What we’ve explored today, also applies to Photoshop. There is a Navigator pallete, a Layers pallete and a History pallete, all of which behave similarly. Check back each Thursday for more tips on PIXLR and other Photoshop tips.
Great introduction!
Woohoo fun! I was planning on using this in an upcoming post, but I'll let you instead. 🙂 Does Pixlr have anything like a Photoshop's masks?
Stopping by from Friday Follow!
Stop by and enter my giveaway 🙂
http://extremepersonalmeasures.blogspot.com/
Hey Happy FF!!!! I'm a new follower and I'd love if you followed me too!!!
I needed this tutorial SOOOOOOOOOOO badly!! You are the master=0)
xoxo,
Carol
http://www.cieloazuljewelry.blogspot.com
Happy Friday Follow! I follow you on GFC and FB. Feel free to stop by and visit (SKOY Cloths & Teething Bling giveaway).
http://hsuperparents.blogspot.com
I have been visiting various blogs for my term papers writing research. I have found your blog to be quite useful. Keep updating your blog with valuable information… Regards
Newest follower from Friday Follow!
Hope you and your family have a great weekend. Happy Mother's Day!
~~ Kat ~~
My Tots Exactly!
My Tummy Calls
My Game of Chance
Just visiting from Friday Follow. When you get a chance, swing by my place and check out some great giveaways! Have a great weekend!
Kel
http://www.betweenthelines-kel.com
Following from Friday Follow! If only I was any good at photoshop! my husband's the buff!
Have a great mother's day!
http://www.coffeeandsippy.blogspot.com
Hi! Stopping by from Friday Follow. Please stop by my little corner of the bloggysphere when you get a chance! I am co-hosting an amazing fundraiser and you could win a week in an Orlando Vacation Home just for donating!!! Plus lots more goodies are being auctioned off.
http://www.fivemonkies.com
Visiting from Friday Follow.
We now follow you publicly through google friend connect. Please visit Mom to Bed by 8 and do the same.
http://momtobedby8.blogspot.com/2010/05/friday-follow-1.html
Happy Friday Follow!
New follow from FF! Your daughter is adorable!
justanightowl.com
I am already a follower! I love your blog! Feel free to stop by my blog and enter some fun giveaways!
http://heavenlysavings.blogspot.com
Happy Friday Follow! Hope to Blog with you again soon!
Following you over from Friday Follow! New follower
Stop by and enter my giveaway:
http://booksbooksthemagicalfruit.blogspot.com/2010/05/freebie-friday-giveaway.html
Oh my!!! Thank you buches!
Thanks for saving me lots of time with pixlr! I didn't know about saving the doc as a .PXD, and lost access to a file I wanted to change after saving. I started over and saved correctly. Thanks so much!
Happy belated Friday Follow!
Love the tutorial… this IS much easier than photoshop – and my kids can use it too!
Stop by and take my poll if you get a minute!
-Buffi
My Wonderfully Dysfunctional Blog
The main advantage of using Pixlr is, you dont need to be very expert to edit your the photos here unlike Photoshop.
Hi guys! PIXLR is an incredibly powerful program and I find it useful. I'll get back to you soon for more tips on PIXLR and other Photoshop tips. I work as a freelance paper writer and on Thursday I will be off:)
This is really nice tutorial about Photoshop, but things i couldn’t understand why baby’s eye is covered by white color. And as an online photo editor i think this tool is works great. And its option is not difficult like Photoshop. Allover nice post.
This tutorial was extremely helpful. I did a search on Google and yours came up. I’ve been wondering how to do this for awhile and now I’m finally able to do it for a personal project. Thanks!!!
That’s an excellent tutorial about photoshop.I learned a lot from that. Thanks for sharing this with us.
This is a well-described tutorial about photoshop. Thanks for sharing.
very easy to understand starting tutorial nor new user. thanks for sharing this post.