
Hello again friends! Lorene here from just Lu to share another fabulous (if I do say so myself) project for all you Whovians out there.
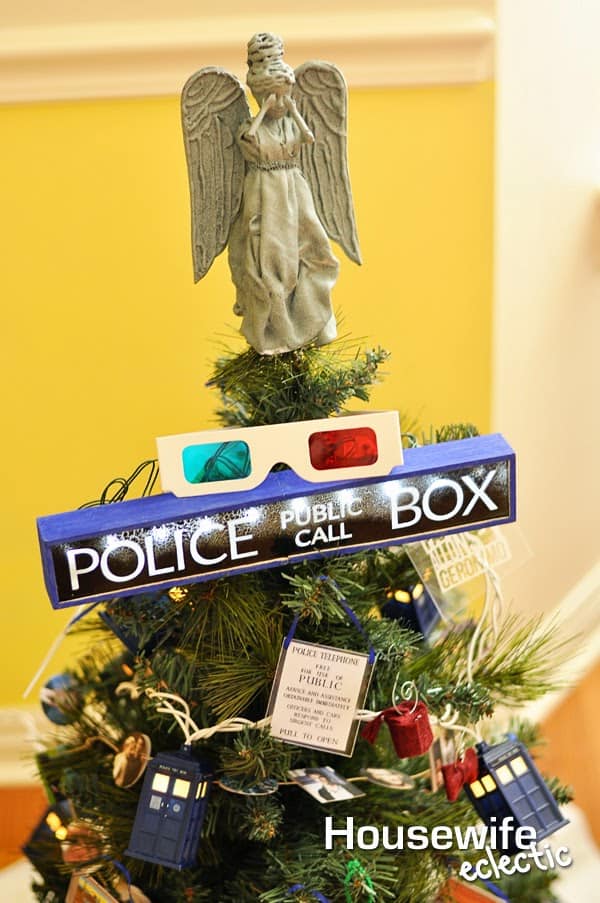
If you’ll remember, last Christmas, I made my favorite Whovian (that’s Debra) a whole Doctor Who tree, complete with a Weeping Angel tree topper, character tree skirt, police box lighted sign, Doctors and companions garland, and oodles of Doctor-inspired ornaments.Today I am sharing the Weeping Angel for the top of the tree.
Don’t be intimidated by this one — it is actually easier than it looks. Just give it some time and patience and know that it will look just plain crazy until you spray paint it. And then it will look fabulous. Spray paint is your friend. Weeping Angels are not.
Doctor Who Weeping Angel Christmas Tree Topper
Supplies
- small Barbie-style toy — mine was a small mermaid toy from the dollar store. If you’re making a tree topper instead of just a mini statue, you’ll only need from the torso up, so the mermaid option was perfect for me.
- small piece(s) of gauzy fabric — color doesn’t matter
- tiny elastic hair band
- foam core or craft foam
- hot glue gun
- toilet paper tube or something similar (for the cylinder that will allow the angel to be on top of the tree)
- a very small amount of primer (I used Kilz, and I’d recommend brush-on over spray)
- stone-finish spray paint
- pipe cleaner (optional)
I followed this tutorial from wich craft for the majority of the process, so I’ll give you the basic gist of how I made it a tree topper rather than a statue and then just sum up the rest of the steps — be sure to head over there for all of the nitty gritty specifics and great explanations.
To start out, you get to dismantle a Barbie! (Skip this step if you are making a statue and not a tree topper)
- Channel your inner Sid (from Toy Story) and remove the legs (or tail, if you also have a mermaid doll) from the doll.
- Attach the toilet paper tube to the doll at the torso — it should be just slightly taller than her legs were to begin with.
- I cut slits in either side of my cardboard tube to overlap the tube and then used packing tape to give her a nice corset to keep her bottom half on securely.
Next, dress your doll in a simple dress. I used two layers of a thin drapey gauze-type fabric, stacked together.
- Cut two rectangles just over twice as tall as your doll and about twice as wide, and fold them in half, so that the folded section is as tall as your doll (plus a couple inches) and still twice as wide.
- Cut a very small V in the center of the folded edge to create a neck hole, and cut down the center of one side, so you have a kind of long drapey vest.
- Dress the doll with the cut side to the BACK — you’ll need it open so you can attach the wings.
- I cinched the dress at the waist with a pipe cleaner, but you could use a twist tie or whatever.
Let’s play hair stylist!
- Give the doll a Weeping Angel ‘do with the tiny hair elastic. I gathered all of her hair into a big bun on top of her head, but you could get creative and style it however.
- Use hot glue to draw the hair texture and secure the hair style. I covered her whole head with hot glue, including adding some extra waves up front like the Angels have. Remember, it will look GREAT once it’s all spray painted 🙂
Let’s play body contortionist! Okay… this is the part that seemed a little bit Sid-style barbaric to me. But remember… it’s a doll. It’s not alive. And it’s most definitely not a real Weeping Angel. Hopefully.
- Cut the dolls arms at the elbow joints and reposition them so that her hands are covering her face.
- Use a liberal dose of hot glue to hold the newly position arms in place. Again, it’s going to look worse before it looks better. Just keep telling yourself “Allons-y” and it’ll all turn out okay.
- You may need to reposition dolly’s shoulder’s too, to get the right positioning.
Now let’s give that angel some wings! You can use foam core for thicker, sturdier wings, but I used craft foam and it worked fine, too.
- Trace a basic angel wing shape on to the foam, leaving a thick paper-doll style “tag” at the inside edge, so that you’ll have something to attach to the doll’s back.
- Cut out two wings.
- Use the hot glue to outline the wings and add the inner carved-looking texture. Remember, this will look strange and possibly terrible, but it will look so much better once it’s spray painted.
- Attach the wings directly to the doll’s back using hot glue or whatever adhesive you prefer, through the slit that you left in the back of her dress. You may need to use some extra hot glue to arrange the dress around the wings properly.
Time to paint!
- Before you whip out the spray paint, you need to prime the Angel’s dress and let it dry thoroughly. This helps set the cloth in folds and give it a really great carved statue-y look. I let the dress pool around her feet some, and used hot glue to add some extra folds and curves so that it didn’t just hang straight down.
- After the primer is fully dried, take her out and spray paint her. I put her on a wooden dowel stuck in the ground so that I could paint all the angles at once.
- Once dry, admire your work… but don’t blink. (Aww, c’mon, you knew I had to say it!)
Stick her on the tree and watch out for all of the potential hazards that lurk when The Doctor is around on Christmas.
Have a wibbly wobbly day,
Lorene
Lu (or Lorene if you prefer) is the mom of 3 kids and wife of a singing and dancing elementary teacher. She happily shows up here at Housewife Eclectic whenever Debra allows, and occasionally blogs on whatever topic comes up over at her blog, just Lu, when she has time in between projects and her awesome job as a virtual assistant.
This is not my thing, this is my wife's.. but i like how your tree is different then most that we see.
I don't know anything about Doctor Who, but it looks very unique and fun.
I don't know anything about Doctor Who, but it looks very unique and fun.
I have a few friends that love Dr. Who – I've never watched it – but I will have to let all my friends know about this fun Christmas tree idea! They will love it!!
I have never seen a topper like that. It came out beautifully.
Michelle F.
OMG I would have nightmares if there was a Weeping Angel in my house! Lol. Great job!
that tree topper is so pretty. I love it. I think it would look amazing on my tree as well.
WOW! I can't believe you made that!
I am beyond impressed with you right now. That turned out fabulously well!