Welcome to Wednesday! I’m so happy to stroll on over here once a week from my little corner of the blogosphere and share web tidbits with you all. Thanks for coming back every week!
I’ve had several request for today’s topic — how to create and share PDFs on your blog — so it’s high time we get down to business.

First, what is a PDF? PDF stands for Portable Document Format, so pdfs are portable documents — they’re easily sharable across different computer operating systems, making them ideal for use in sharing documents online. A pdf is basically a specialized type of image that preserves the layout of your document. When you share a pdf, your readers can open and print the document (using Adobe Reader, a free pdf reader) without needing to have the same fonts, images, or original software on their computer. PDFs are perfect for sharing any kind of document that your readers will want or need to print: patterns, recipe cards, tutorials, etc. A pdf is represented by the icon to the left.
Creating a PDF
To create a pdf file, you need a specific software. Adobe Acrobat is the most common commercial (it costs $$) program, but, luckily for all of us, there are also many free programs that allow you to create pdfs. These programs are often called pdf printers because they act like a printer on your computer: to create a pdf, you send it to the pdf printer instead of your regular ink-and-paper printer.

The program I’ll show you today is called PrimoPDF. You can learn about it and download it here and it is, of course, free. (I’ve also used a program called CutePDF. CutePDF has a few more options, but I think that PrimoPDF is easier to use for basic pdf creation, plus it looks nicer. 🙂
Once you’ve installed PrimoPDF (skip installing the Uniblue Registry Booster that comes with it unless you want that), you’re ready to get started creating your pdf.
1. Open the document (word processing, spreadsheet, image, etc) that you want to pdf-ify. Any file that can be printed can be pdf-ed.
Many readers (like me) may download your pdf file when you first share it and come back
to the file days or weeks (or longer) later when they are ready to use
it. For that reason, I suggest including the title of the document (such
and such pattern or tutorial or recipe) and your name and blog address
in the original document before you convert it to pdf. This both helps direct
people back to your site and prevents any dishonest people from stealing
your work and passing it off as their own.
2. Select File > Print to send the document to the printer.
3. In the Print window, select PrimoPDF from the list of printers.

4. Click OK or Print. This will open the PrimoPDF window.

5. (optional) Click Document Properties to enter the title, author, subject, and/or keywords for the document.

- Again, I would recommend always including your name and blog title in the actual document so that it can always be traced back to you, but the information you include here in the document properties also helps provide information to search engines.
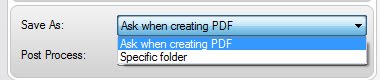
6. In the Save As menu, you can select either Ask when creating PDF or Specific folder. If you plan to save all of the pdfs you create in the same folder, select Specific folder. (Note that Primo PDF only lets you select folders on your desktop.) Otherwise, leave Ask when creating PDF selected to choose a separate location for each pdf.
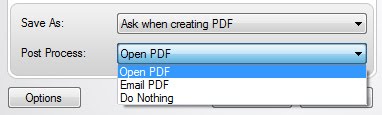
7. Post Process is the action that will happen once the pdf has been created. Open PDF will open the pdf using Adobe Reader. Email PDF will open your desktop email client (such as Outlook) and create a new email with the pdf attached. Do Nothing will, of course, do nothing. I like to have my pdfs open so that I can make sure they look exactly like I want, so I choose Open PDF.
8. Click Create PDF.

9. If you selected Ask when creating PDF in the Save As menu, now is the time that you’ll select where you want your pdf saved on your computer and enter the file’s name before clicking Save. (The pdf will be a separate file, not a replacement for your original document, and because it’s a different file type, the names can be the same, if you’d like them to be.)
10. Give yourself a pat on the back because you just created a pdf!
 |
| image source |
Sharing your PDF
Now that you have your pdf file, you’re just two steps away (okay, the actual numbered instructions count five steps…) from sharing it with your readers!
In a nutshell (full instructions below), you’ll upload your pdf to a document sharing site, such as Google Docs or Box.net. Then you can choose to either link to the document or embed the document so that your readers can see the document.
- Linking to your document looks just like a normal link, like if you were linking to another blog or website.
- Embedding your document shows a preview of the document right in your blog.
Normally, my Google-loving self would use Google Docs, but I just discovered Box.net and… I’m converting. For a couple of reasons, Box.net is better, in my opinion:
- Box.net has a better “box” for embedding documents. The box lets your readers download the document right from where you embed it in your post, without having to go to another site to download. One or two fewer clicks makes it more likely that more people will download the document and less likely that they will encounter problems.
- Box.net has an easier upload and share interface. Google Docs interface is good, but Box.net has drag-and-drop file upload. Major lovin’ there.(The little upload status bar at the bottom will confirm a successful drag-and-drop.)
The process of uploading and then linking or embedding your document is about the same regardless of which service you use, so I’ll show you using Box.net, with a couple special notes for Google Docs.
1. Log in and upload your document. Be sure you select the pdf version and not the original version (the Word document, spreadsheet, etc).
2. Once your file is uploaded, you’ll copy the code either to link to or to embed the document.
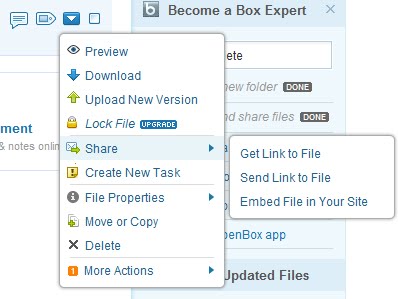
Box.net: Click the little down arrow icon, select Share, and then select either Get link to file or Embed file in your site. Copy either the link URL or the embed code.
Google Docs: Click Back to Google Docs (upper left corner) and then click the link in the Folders/Sharing column (not the actual title of the document… dumb, I know) to get to the Sharing view where you can copy either the link to either Paste in email or IM or to Embed in a webpage or blog.

3. Open or create the blog post where you will link to or embed the document.
4. For a link, just paste the copied URL in the Link window just like you would to link anywhere else.
5. For an embedded document, switch to Edit HTML view and paste the copied HTML code at the point where you want it in your post. You won’t see the actual “box” in your post editor when you embed a Box.net document, but you will see the frame of the Google Docs box (and a “loading” message) if you embed a Google Doc. Both will show as they should when you Preview and/or Publish your post.
Once you publish your post, your readers have access to that pdf and can download it to save and/or print.
Also, keep in mind: When sharing a pdf that you didn’t create, it’s courtesy to link back to the blog post or webpage providing the pdf and not directly to the pdf file. With a file you created and own, you can link directly to the pdf file.
As always, let me know if you have any questions about this or any other web-related topic. Questions make my technical writer heart leap with joy, especially if I know or can find an answer. 🙂

Have a wonderful Wednesday! If you get in a crafting mood this week, come on over to just Lu — I’m sharing some really fun tutorials tomorrow and hopefully Saturday!
 Lu (or Lorene if you prefer) is the mom of one squirmy boy and the wife of a singing and dancing elementary teacher. She is the proud author of this weekly Wednesdays on the Web (WotW) segment here on Housewife Eclectic and spends the other days of the week blogging about crafts and whatever else comes up at just Lu.
Thanks for all the information!
You are such a wealth of techno info – thanks!!
This has nothing to do with your PDF post. I went to your Lu blog but there is no way to contact you there. I loved your quilling post. Did you know its also called Paper Filigree? I've been quilling for over 50 years and love it. You might want to add the comments section on your Lu blog or a way to contact you. We wanted to add your blog to our list for crafters.