• Skip to secondary menu
  • Skip to main content
  • Skip to primary sidebar

Housewife Eclectic

Recipes, Crafts, Book Reviews and More

  • Tutorials
  • Recipes
  • Books
  • Parenting
  • Tech Help
  • About Me
  • Printable Store

Easy Minifigure Ornaments — that won’t damage the figures!

December 18, 2014 by Wifeeclectic 13 Comments

Hello again! Lorene here with one final (for now) addition to the Doctor Who tree — minifigure ornaments! Debra has quite the collection of Lego-style Doctor Who minifigures, so I wanted to find a way to hang them on her tree — without damaging them, so when Christmas is over, they can go right back to the regular collection.

And, thanks to my overachiever gene ;), I came up with not just one but THREE different ways to hang minifigures on your Christmas tree (or elsewhere), and no minifigs were harmed in the making of these ornaments. (And PS: Debra’s gonna need a bigger tree to fit her whole collection!)

How to Make Lego Minifigure Ornaments (without damaging the figures!)

Option 1: Leather Cording

This was my first idea, sprung from the knowledge that Lego minifigure hands are just the perfect size to hold electronics cords. I doubt that was a coincidence 😉

But instead of holding a charger cord, these little guys hold their own ornament hangers! Just cut a 6-inch (or longer) length of 3mm round leather cording (I found mine, called leather lace, at Hobby Lobby) and stick one end in each hand with the arch over the figure’s head.

Option 2: Ribbon and Metal Tubing Lanyard

For your average minifig, option 1 works just fine. But what about those suave minifigs who need their accessories? Christmastime is a perilous season for Whovians, so you certainly don’t want your Doctor hanging around without his sonic screwdriver. Enter option 2: a simple ribbon lanyard with a section of metal tubing for your figure to grasp firmly.

The basic concept is the same as a shoelace aglet (the thingy on the tip of the lace), only instead of just threading a single lace into the aglet, you thread the two ends of a loop through the tip. A million thanks to this tutorial here for the information that I needed about how to do this!

So, you’ll need

  • hollow metal tubing, 1/8 inch (I bought this multi-size pack at Hobby Lobby and used the middle size – you only need 1/2-5/8 inch for each ornament lanyard)
  • thin ribbon (mine is 1/8 inch satin ribbon)
  • a hammer and sharp nail
  • a small fine-tooth saw
  • sandpaper
  • tape
(Step 1)With the saw, cut 1/2 to 5/8 inch sections of the tubing — you want 1/2 inch minimum, because you have to have enough length for your figure to have an un-flattened section of the tubing to hang on to. If you have a vice grip, that would probably be better, but I just used two scraps of wood with the tubing taped to them. The tubing is pretty easily bent and smashed, so use care that you don’t damage it beyond use. 
(Step 2) Sand the ends of the cut tubing sections. I just used our little household hacksaw, so mine were really rough. A finer saw would definitely give better results, but this worked. 🙂
(Step 3) Cut a 6-8 inch section of ribbon, and, while holding both ends together to form a loop, wrap the tape tightly around the ribbon ends. Leave some tape over the edge of the ribbon to form a sort of tape needle to help you thread the ribbon through the piece of tubing. 
(Step 4) Slide the ribbon into the tubing until the tape is completely covered by the tubing at the top (you’ll trim the bottom later). 
(Step 5) Tape the tubing to something sturdy, like a scrap of wood, and lightly hammer the very tip of the tubing (to give the nail a little bit more surface to grab).
(Step 6) Hammer the nail into one end of the tubing to pierce the metal tube and pinch the ribbons inside. (I found that it was easier if I .) 
(Step 7) Repeat for the other end, being sure to leave the center section round and lovely for your minifigure’s hand to grip well. Trim the bottom end of the tape or any ribbon. 
Hand it to your favorite Doctor or mini-figure, and away you go!


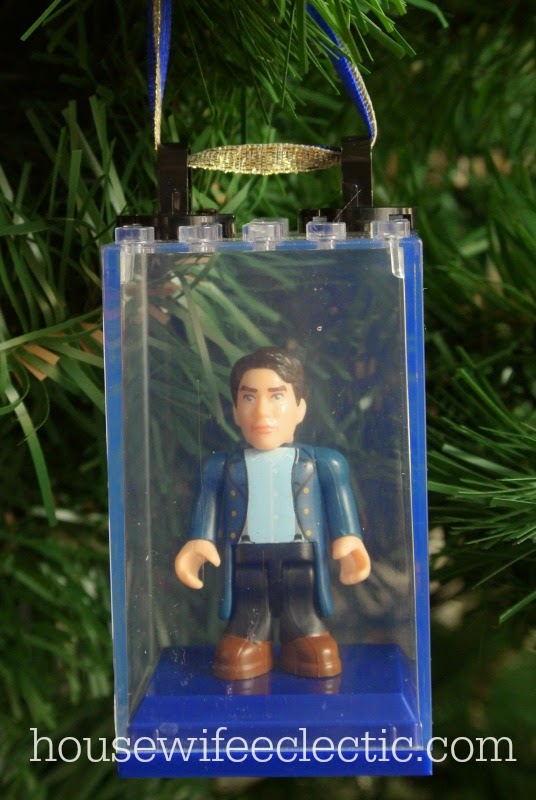
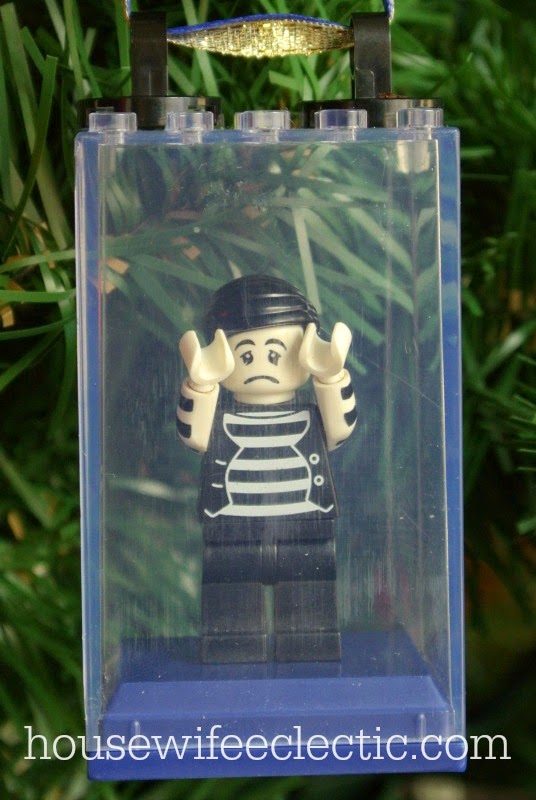
Option 3: Display Blox and LEGO Lifting Rings

Many of the character building collector sets come in display blox that are Lego-compatible, so why not put that to use? (You can also purchase Lego style single minifigure display boxes various places online, such as eBay.)
All you need is a lifting ring or two and some ribbon or string. I purchased my Lego lifting rings on eBay very inexpensively, which I was glad for when I received them and realized I would need TWO for each ornament since the Doctor Who display boxes do not allow for the lifting ring to be centered on the top of the box! But one on each side works well, or if you have a figure that faces the other way (like this Dalek), you can get by with just one. 
I used about 8 inches of ribbon to string through the two rings and tie a knot at the top — use more if you want a bow or anything fancy. 
And just because it cracks me up… one more photo: the mime in the box! 🙂
(PS: I’m not sure he’s actually a mime but it tickles my funny bone so we’re going with it…)
So, what do you think? Are you going to have a Lego-filled tree now?
Check out the rest of the Doctor Who Christmas tree here. 
Lu (or Lorene if you prefer) is the mom of 3 kids and wife of a singing and dancing elementary teacher. She happily shows up here at Housewife Eclectic a few times a month, when the creative bug strikes in between projects at her awesome job as a virtual assistant. You can check out her other projects here on Housewife Eclectic, or her former blogger life and projects over at just Lu.

Filed Under: Uncategorized Tagged With: by Lorene, Christmas, Doctor Who, Geek Blogging, Lego

Reader Interactions

Comments

  1. Masshole Mommy says

    December 18, 2014 at 8:20 pm

    We have zillions of minifigures laying around out house. Cute idea.

    Reply
  2. B says

    December 18, 2014 at 9:43 pm

    How cool is this? Such awesome ideas! My babe is too young to play with Legos but I will definitely keep this in mind.

    Reply
  3. Debi Wayland says

    December 18, 2014 at 10:00 pm

    These are so cute! I adore Legos and still have a bunch from when I was a kid. Thanks!

    Reply
  4. Michelle Feliciano says

    December 18, 2014 at 10:04 pm

    That is such a cool idea. My nephew would love that.

    Reply
  5. Heather Jones says

    December 18, 2014 at 10:14 pm

    That's Neat! My son loves Lego characters, this would be fun to do with him.

    Reply
  6. jen temcio @dapperhouse says

    December 18, 2014 at 11:25 pm

    My son is a lego FREAK and he wants a small Christmas tree to decorate for his room this year. I cant wait to show him this when he gets home tonight. This is perfect!!

    Reply
  7. Amy Stenehjem-Kelsch says

    December 19, 2014 at 6:32 pm

    LOVE the leather cording idea- so create!

    Reply
  8. Liz Mays says

    December 19, 2014 at 10:00 pm

    It's a great idea to put them on the tree this way. That mime definitely does make me giggle too.

    Reply
  9. kristi dominguez says

    December 19, 2014 at 10:13 pm

    This is absolutely GENIUS!! I've been wanting to do a tree just for my boys (ages 7 &10) and filled with their faves…now I know how to do it!!

    Reply
  10. JaimeLovesStuff says

    December 20, 2014 at 3:20 am

    Ah! Get out! I love this! I am totally doing this for my nephews presents this year!

    Reply
  11. BonBon Rose Girls Kristin says

    December 20, 2014 at 4:38 am

    Love the leather cording idea! Perfect for my lil' man!

    Reply
  12. Maddi'sMommy says

    December 21, 2014 at 3:48 am

    Oh I love this! What a great idea and perfect for turning your favorites into ornaments.

    Reply
  13. Caitlin Fore says

    December 21, 2014 at 5:19 am

    Awe those are adorable!

    Reply

Leave a Reply Cancel reply

Your email address will not be published. Required fields are marked *

Recipe Rating


Primary Sidebar

Connect with Us

Facebook
Twitter
Follow Me
Instagram
Pinterest
RSS
Follow by Email

Welcome to Housewife Eclectic

Debra Hawkins - Housewife EclecticHi, I'm Debra. I am a craftaholic photographer married to a web-programming amateur chef with two sassy littles keeping it interesting. It gets crazy around here. Read More…

Archives

Copyright © 2025 · Lifestyle Pro on Genesis Framework · WordPress · Log in