I don’t know if it’s part of Murphy’s Law or what, but without fail, people develop a zit or pimple the night before a photo shoot. This is especially true with brides. As a photographer, you are expected to somehow make this all better and make the subject look absolutely perfect. Of course, as a photographer, you know this is impossible. Never fear, you always have Photoshop and digital skin care is so easy you’ll wonder why you haven’t done it to all your photos.
Before I begin, let me address a few critical points.
1. There is nothing wrong with having skin blemishes. It’s a natural part of being human. Unfortunately, when a picture is hanging on your wall, you usually don’t want to look at those blemishes. But, before you go crazy and remove every possible blemish, ask yourself if there is some value to keeping it. For instance, little kids often have scrapes and scratches all over their faces. Sure, it may make your kid look like a neglected child, but that’s what the kid really looks like at that age. Sometimes it’s endearing to have those pictures. Sometimes you just want to have a perfect picture. Only you can decide.
2. Don’t go too overboard with removing blemishes. If you remove every single line and wrinkle, you will end up with a plastic effect, where your subject looks more like Barbie and less like a real person.
3. On the other hand, don’t be afraid to remove blemishes. I’ve never had someone upset because I made them look better…
Here we go!
Step 1: Open the picture you want to improve in Photoshop.

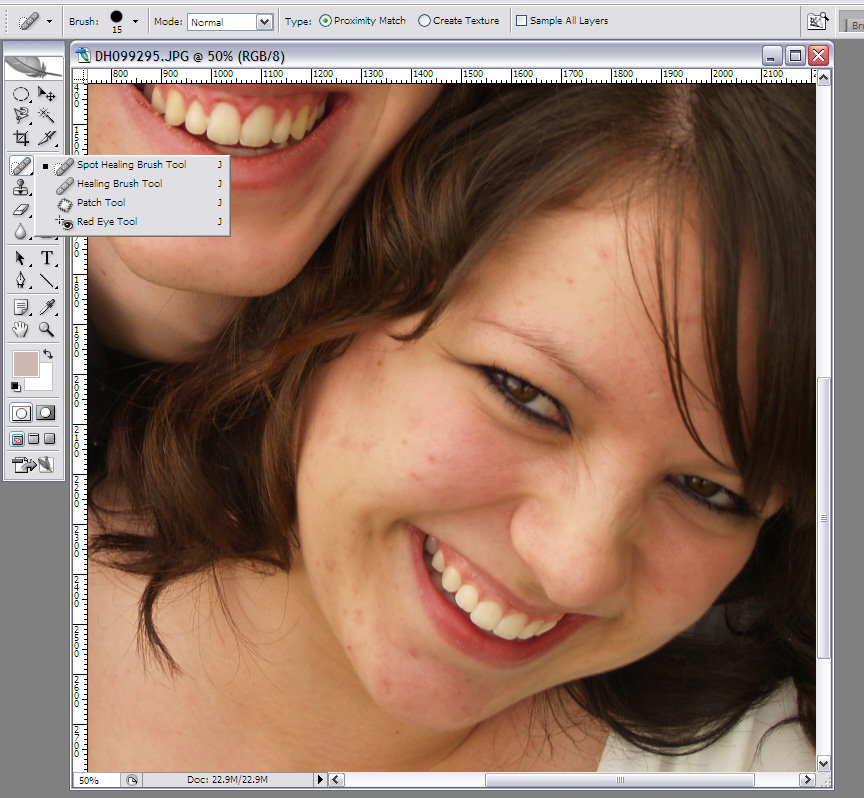
Step 2: On your Tools palette, select the Spot Healing Brush (four down from the top on the left). Look above at the tool options, just underneath the menu and make sure the Proximity Match option is selected.
The spot healing brush works by selecting colors and textures near the area you want to improve and use those to replace the area you want replaced.
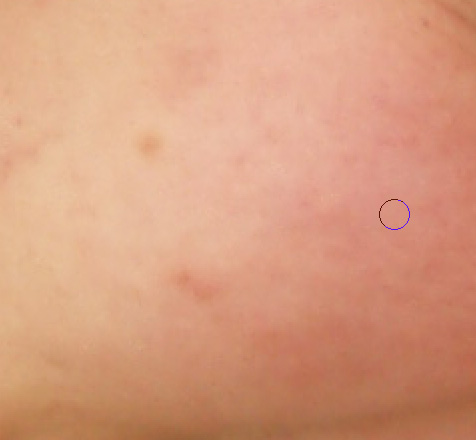
Step 3: Zoom in until it’s too close for comfort. You really have to be zoomed in to do a good job with this. I recommend at least 100%, if not more. I try to stay in the 150-300% range most of the time. Any less than this and you may miss things. Any more and you’ll spend all day fixing problems you never even knew were there.
Step 4. Find the right brush to use. Go to the tool options just underneath the menu and click on the brush. This gives you multiple brush options, including diameter, hardness and spacing.

For the average user, you will not need to worry about spacing. The brush size is up to you, depending on how big the blemish is and how zoomed in you are. I usually err on the side of smaller brushes because if you select too big of a brush, you may end up with weird side effects. The hardness option changes how hard the edges are. If you are really good at it, you can leave it at 100. For starters, try dropping it down somewhere between 70-90.

For the average user, you will not need to worry about spacing. The brush size is up to you, depending on how big the blemish is and how zoomed in you are. I usually err on the side of smaller brushes because if you select too big of a brush, you may end up with weird side effects. The hardness option changes how hard the edges are. If you are really good at it, you can leave it at 100. For starters, try dropping it down somewhere between 70-90.
Step 5: Find a blemish.

Place the brush over the blemish, click and hold and make a small counterclockwise circle over the blemish. Let go of the mouse. Your blemish is gone! That easy.

Why did you have to go in a circle? You could have just clicked, but sometimes that leaves a weird effect that’s very obvious. By going in a circle, you use more of a sampling area for the tool and it looks more natural. Be careful not to make too big of a circle or you will ruin other areas of the photo.

Place the brush over the blemish, click and hold and make a small counterclockwise circle over the blemish. Let go of the mouse. Your blemish is gone! That easy.
Why did you have to go in a circle? You could have just clicked, but sometimes that leaves a weird effect that’s very obvious. By going in a circle, you use more of a sampling area for the tool and it looks more natural. Be careful not to make too big of a circle or you will ruin other areas of the photo.
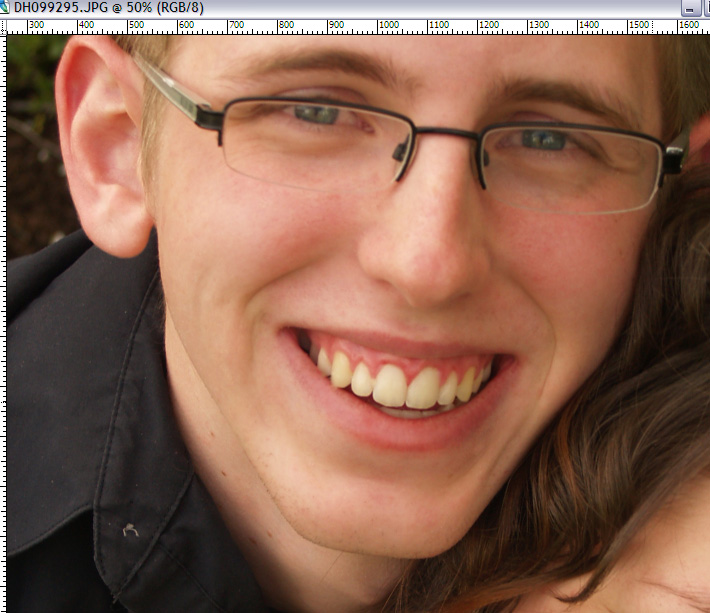
Step 6: Repeat Step 5 for as many blemishes as you want to remove. You may have to scroll to other areas of the screen. I find the Hand Tool allows me to quickly move around. You can access this tool by simply pressing the H key on your keyboard. Then, simply click on the image and drag it to where you want it moved. Press the J key on your keyboard to go back to the Spot Healing Brush.
Step 7: Sometimes there are tough-to-reach areas and no matter how small you shrink your Spot Healing Brush, it doesn’t seem to work. Or maybe you can’t get the colors just right or it samples weird areas. Have no fear. There is another tool that can help: the Clone Stamp Tool, which is located just below the Spot Healing Brush on the Tool Palette.

This tool works similar to the Spot Healing Brush, with one extra step at the beginning. Your first step is to find an area of skin NEAR the blemish you think looks good.

Press and hold the Alt key on your keyboard and click on the good area. Let go of the Alt key and now click on the blemish. Your blemish will be replaced with the good area. It’s called a Clone Stamp Tool because it’s basically making a clone of the area you sampled and stamping it over the blemish.

While this tool has many great applications, it’s not as easy to use as the Spot Healing Tool. I find I use this tool as a second option, and especially in hard-to-reach spots. Also, I have found this tool extremely useful in dealing with old photos.

Step 8: Your blemishes should be pretty well gone by now. But what about dry lips? Can you use these tools for that? Sure, but sometimes lips have interesting textures and are close to skin and teeth, which can make sampling difficult.

One technique you can use is the blur tool. I know what you’re thinking: “I don’t want to blur my photo.” Sure, nobody does, and honestly, this is kind of a cheating method. I don’t use it unless I have to, but sometimes it’s your best option. Select the Blur Tool on the Tool Palette (it looks like a raindrop). Now, go the tool option underneath the menu. The default mode is normal. Click on where it says Normal and select Darken. Now, use the Blur Tool to go over the dry, cracked lips. You need to click and hold the mouse button down while you drag it over the area. You may have to go over the same area multiple times. If the picture is in very high-definition near the lips, this may not work. If not, you should see the lips start to “heal” themselves.

It may leave certain dark areas. Now you can use those other tools to clean up the darker areas with greater ease.
Cleaning up skin is not difficult, but it does take practice and patience. After cleaning up a bridal shoot, I always find myself wishing I had my own Photoshop palette when I apply my own makeup in the morning. Work on that, will you, CoverGirl?
– Debra
i SERIOUSLY need to learn how to photoshop..like fo' shizzle!
I found your blog through a Friday Follow Blog Hop! I would love it if you came by and followed me also!
http://haltonmom.blogspot.com
Such a great tip! I can barely open photoshop! Love this tip. Visiting from new friend friday!
This is awesome! I am just getting into photography, and I look forward to reading more from you! I found you through new friend Friday!
Lindsey http://babyinthebigcity.blogspot.com
Great tips! Thanks for stopping by.
Dang…can you fix up the 10,000 pics I got on my cpu? Nice work linking up first – following along
D'OH Crap
following along…stopping by…same difference lol
Great tutorial. I'm a ditz when it comes to PS!
Oh, I love photo shop! It is the best! Great tips though! I am already your follower. Great blog! come by my site and visit at http://showmemama.blogspot.com
Thanks and have a great weekend
I've always wanted to learn PS! I need to get the software first. 🙂
I'm here from Friday follow! Have a great weekend.
Again, more great tips!
And I would LOVE more tips on beginner SLR cameras if you wouldn't mind! Email: careyandjon at hotmail.
Thank you!
Have a fabulous Friday!
Blemish control makes a huge difference! Thanks for showing me how.
Found you on New Friend Friday, and I'm so so glad I did! I have Photoshop but I feel like a kindergartener with what little I know about it! Always useful to learn more! Can't wait to be a new follower and learn more on Photo Thursdays!
Katie P
Food, Wine, & Mod Podge