• Skip to secondary menu
  • Skip to main content
  • Skip to primary sidebar

Housewife Eclectic

Recipes, Crafts, Book Reviews and More

  • Tutorials
  • Recipes
  • Books
  • Parenting
  • Tech Help
  • About Me
  • Printable Store

Photography Backdrop Stand Tutorial

July 15, 2013 by Wifeeclectic 11 Comments

VeryJane.com provided the backdrops featured with this Backdrop Stand Tutorial. The stand was created 100% by my husband and I and all opinions are my own.

When I started my photography business six years ago, I began shopping for backdrop stands, but, I couldn’t find exactly what I wanted. I wanted more width and height than I could easily find at the time and I really wanted my stand to have two cross beams — one tall for brides/adults and one shorter for babies and toddlers. Price was also a factor; I needed the stand to be affordable.

After talking about it with my husband, we decided we could make what I wanted out of PVC, easily and at an affordable price. We built this backdrop stand back in 2009 and I have been using it ever since. I have successfully used it for indoor bridals and families, but it is best used for children and babies.
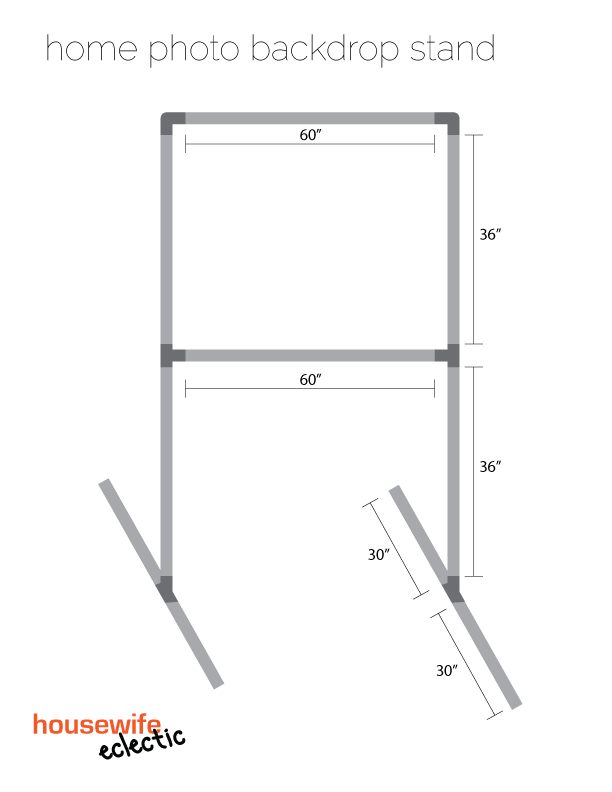
You will need:
1-inch PVC pipe in various lengths. We cut ours with a saw, but a lot of home improvement stores will cut them for you.

  • 2 Crossbars – 60 inches long, each
  • 4 Side supports- 36 inches long, each
  • 4 Bottom supports- 30 inches long, each
Home Photography Studio
Assorted 1-inch PVC joints
  • 2 Elbow joints
  • 4 Tee joints
Clamps (Found by the tools)
Backdrops, VeryJane.com has the absolute best deals on backdrops
Photo Studio in Home
Once you have all of your pieces cut, you have the ability to build two different backdrop stands. You can either use all of the pieces for the full height of 66 inches, or you can make the smaller stand omitting two of the side pieces for a height of 39 inches.  These heights include the joints.
For both stands, two base supports will sit on the floor on either side of the crossbars. Connect the base supports with a tee joint.

Homemade Backdrop Stand
Place a side support in the top part of the tee joint. If you are making the smaller backdrop stand, cap the side support with the corner joint and then repeat with the other side, joining the two sides with the cross bar. If you are going for the taller stand, cap it with another tee joint and add another side support on top, capping that one with the corner joint.
Your back drop stand is ready to use. Roll your backdrop around the cross beam and clamp. These darling backdrops are from VeryJane.com. VeryJane is a deal site that offers cute clothes, jewelry, fabulous backdrops and more at very discounted prices. I love getting backdrops through them because they are the same awesome backdrops that I use to order from a backdrop company at a fraction of the price. Check their site everyday for new deals on fun items like backdrops.
You can find all the places I have linked this project to here.

post signature

Filed Under: Tutorials Tagged With: Arts and Crafts, Photo Thursdays

Reader Interactions

Comments

  1. Britney Mills says

    July 15, 2013 at 3:06 pm

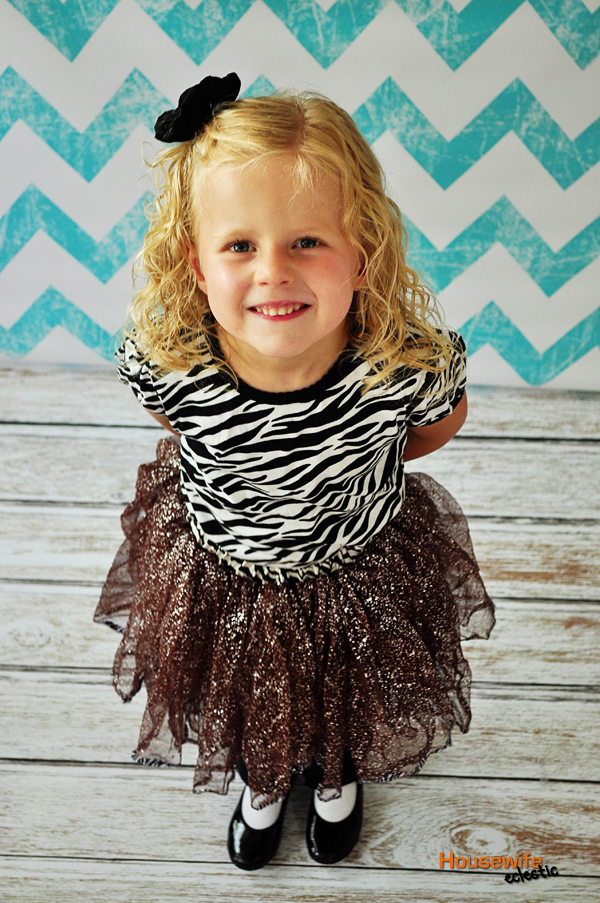
    I love the color of the chevron! And the picture looks awesome as well! Thanks for sharing!

    Britney @ The Princess & Her Cowboys

    Reply
  2. Lorene Nance says

    July 15, 2013 at 3:14 pm

    I love your backdrop stand and I LOVE the one of her with her tap shoes showing! So cute. The backdrops are so fun!

    Reply
  3. marissa | Rae Gun Ramblings says

    July 15, 2013 at 3:29 pm

    oh wow that is so cool. I guess I could call harry, ron and hermione my only photo back drop. This would be way better! no seriously I think I need to check out getting a backdrop set up

    Reply
  4. Becky @ Utah Sweet Savings says

    July 15, 2013 at 4:53 pm

    Love this idea! Thanks for sharing.

    Reply
  5. Marissa Sexton says

    July 15, 2013 at 6:35 pm

    This is absolutely ingenius Deb! I pinned this morning for future reference. Great job!!

    Reply
  6. Yvonne says

    July 15, 2013 at 7:42 pm

    What a great tutorial, I could use something like this for my food pictures! Thanks for sharing –

    Yvonne @ Triedandtasty.com

    Reply
  7. Kimberlee Gibson says

    July 16, 2013 at 1:08 am

    What a great idea – I am going to show this to my husband and see if he can fix one up for me – we have some of those pipe fittings but not all of them. Thanks for sharing.

    Reply
  8. Emily says

    July 16, 2013 at 9:37 pm

    I've been wanting to make one of these for pictures of my little guy. Thanks! I've pinned it!

    ~Emily
    A Tossed Salad Life

    Reply
  9. Adrianne at Happy Hour Projects says

    July 17, 2013 at 12:29 pm

    Okay so can you break this down for travel, then? Or did you glue the joints? Or do you have the option of doing either? Because this looks very do-able, but it's so big… I don't have an actual studio to store something like that. 😉

    Reply
  10. Rochelle Barlow says

    July 18, 2013 at 9:51 pm

    What a great stand! I need to make one for myself for when I make videos for my blog. It wouldn't hurt if I had a cute background for photos for my kiddos as well. I am going to pass this on to a few of my photography friends as well.
    Rochelle @rochellebarlow.com

    Reply
  11. Cathy Trochelman says

    July 21, 2013 at 3:37 am

    Thanks for the tutorial – pinning for future reference! 🙂

    Reply

Leave a Reply Cancel reply

Your email address will not be published. Required fields are marked *

Recipe Rating


Primary Sidebar

Connect with Us

Facebook
Twitter
Follow Me
Instagram
Pinterest
RSS
Follow by Email

Welcome to Housewife Eclectic

Debra Hawkins - Housewife EclecticHi, I'm Debra. I am a craftaholic photographer married to a web-programming amateur chef with two sassy littles keeping it interesting. It gets crazy around here. Read More…

Archives

Copyright © 2023 · Lifestyle Pro on Genesis Framework · WordPress · Log in