Some blogs get lucky and seem to gain followers with almost no effort, but they are the exception rather than the rule. Most blogs need to have a solid strategy to become large and successful. A big part of a blog strategy is understanding how to use social media to effectively extend the reach of your blog. This is what we discussed last week.
This week, we’re going to dive into exactly how to make that happen. We’ll start with the easiest social media platform: Facebook, which has an insane membership and rabid followers. This means there are plenty of people with whom you can network and attract to read your blog.
Building Your Blog’s Presence on Facebook
Just like any major company, your blog can have its own page on Facebook. For free. Oh, and did I mention it’s easy to do?
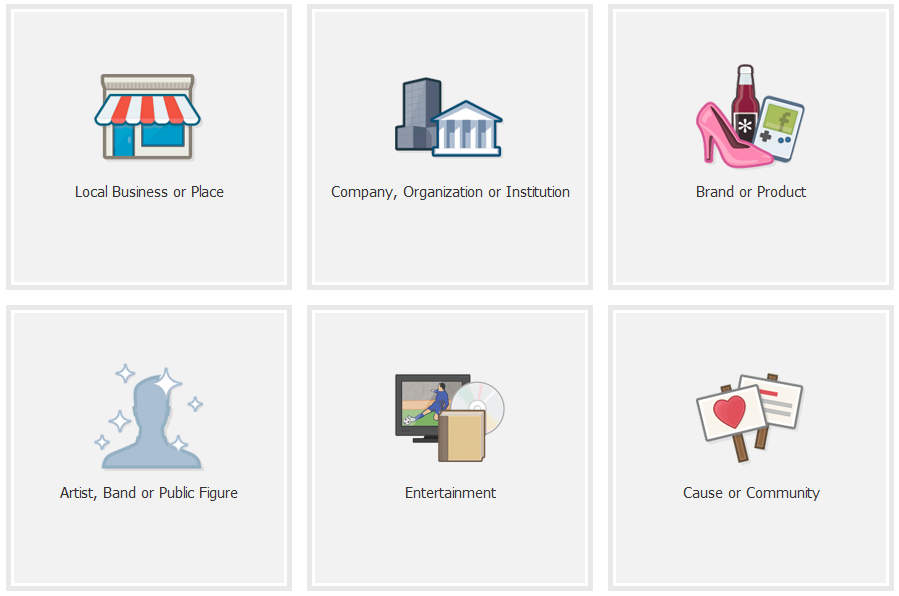
To get started, visit https://www.facebook.com/about/pages and click on the Create Page button. You will then be taken to a page where you declare what your page will be about. Depending on what you want to brand yourself as, you can select either “Brand or Product”, “Entertainment”, or “Company, Organization or Institution.” For most blogs, the easiest category would be “Brand or Product.” Click on that square to begin.
Go through the 3-step setup process. Step 1 is uploading a profile picture. I would recommend uploading your blog’s logo, if you have one.

Step 2 allows you to describe your blog. Tell a little about your blog. Maybe you can even copy and paste what you have on your About page on your blog. Make sure to put the URL to your blog here, as well as to any other social media sites associated with your blog.

Step 3 is selecting a custom Facebook Web Address. Try to keep this as short, simple and memorable as possible.
Once that’s all ready to go, you will be taken to your page’s Admin Panel. This is where all the action happens. It’s fairly similar to the dashboard for your blog.

1. The Notifications area tells you what’s been happening on your page recently. It will tell you who has liked your page, who has posted comments, etc. You can also share something on your own page right here.
2. The Messages panel is just like your personal messages on Facebook, except these are messages unique to your page. This is a great way to respond to questions from certain followers. If you don’t want a messages feature, you can always disable it.
3. The New Likes section is important because it will show you who has liked your page recently. On Facebook, likes are similar to followers. Whenever you get a new like, you should do your best to reach out to them in some way. Maybe send them a message thanking them. Maybe share a link to a past blog post you think they may enjoy.
4. Once you have 30 people like your page, your Insights will appear. These are analytics tools (graphs) that will show you how your page is doing. It will tell you how much traffic is coming to your page on a daily basis and how engaged they are. This will help you make decisions on how to better your blog.
5. The final section is to Invite Friends. Because your page is new, you will want to invite your friends to spread the word. Hopefully your friends are good enough to come and like your page too, which will give you a big boost in likes.
Now is a good time to talk about what your page means. Your new Facebook page is public, which means anybody in the world can like it and follow what’s happening. That’s good because it increases your exposure and hopefully it all links back to your blog, increasing traffic and readership.
Custom Facebook Cover Image
Scroll down past your Admin Panel and you’ll see the profile image you previously uploaded. Here, you can also add a cover image, just like you would for your own Facebook timeline.
Creating a good cover image is important. It’s one of the first things people will see when they visit your page and it speaks volumes about your brand. Are you legit or just another blog posing on Facebook? Take the time to make a quality cover image.
Creating a custom cover image is easy. If you have Photoshop, you can design it there. If you don’t, you can use PIXLR, an online image-editing site that is so similar to Photoshop it’s scary. The following cover image tutorial will be done in PIXLR, but can easily be followed in Photoshop.
You can make a custom Facebook cover image by making a collage of images, creating your own from scratch or by using an image you like and adding to it. We’ll do the last option.
1. Find an image you feel would make a good background to your cover image. Make sure you have the rights to this image. Maybe you have a picture you took that you really love and feel defines your blog. Use it.
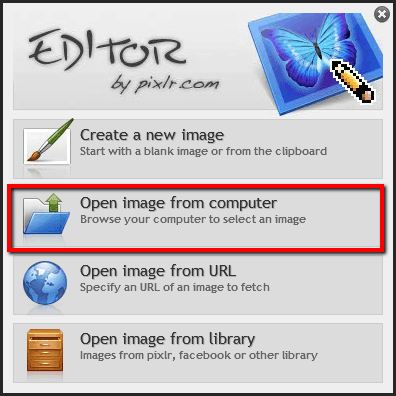
2. Upload this image to PIXLR by clicking on the Open Image from Computer icon.
3. Once your image is uploaded, you will need to crop it to the correct dimensions.

To do this, select the crop tool.
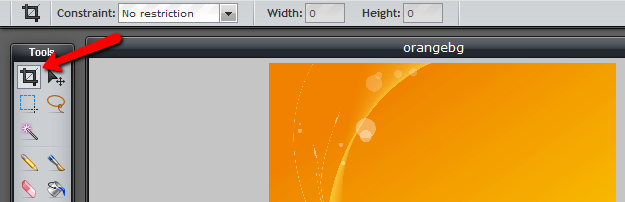
In the menubar above the toolbar, select the Constraint drop-down menu and select Output size.

Now set the dimensions. In the Width box, type: 851px. In the Height box, type: 315px. Press Enter.
Now, drag a box across your image. You’ll notice it creates a long, narrow rectangle. You can position this rectangle wherever you want on the image. Whatever is inside the rectangle is what will remain after you crop.

Once it’s just how you want it, press the Enter key. Your image is now cropped.
4. Add extra details. You can add other things on top of this image. A good thing to add would be your blog’s logo (if you have one) or simply type the name and URL of your blog. You can do this with the Typing tool, which looks like the letter A.
5. Once everything is just how you want it, it’s time to save the image. Go to the File menu and select Save.

In the Save dialog box, type the name of your image (coverimage) and in the Format menu, select PNG. Press OK.
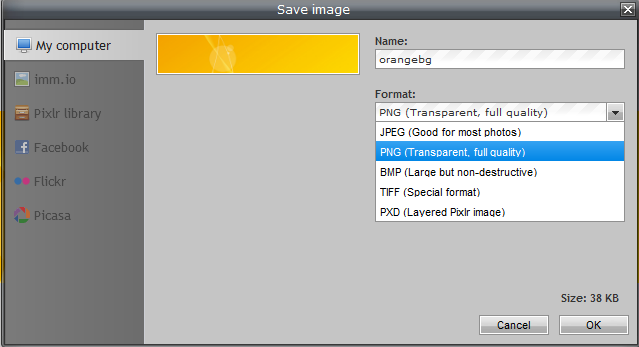
Now your computer’s save dialog box will appear. Again, you have the option of changing the file name if you want. But, there’s one thing you definitely need to do here. After the file name, make sure to type “.png“. This will make sure the computer saves it correctly.

6. Upload your cover image to Facebook.

Click on the Add a Cover button and select Upload Photo… Select the cover image you created. Your cover image should now be in place.
A word of caution about cover images. Make sure it does not look just like your profile image. You get two images for people to immediately see when they visit your page. Make sure you use both of them to the fullest potential by allowing each to tell something useful about your blog. Also, make sure your cover image isn’t too busy with excessive colors, too many images (in the case of a cover collage) or contains too much typing. Remember, less is more, when it comes to building a brand.
Adding Content
OK, so you understand the Admin Panel and have your cover image. Now it’s time to add engaging content. Your blog’s Facebook page is an extension of your blog, so you need to have interesting things for people to view when they visit.

Underneath your cover image, you will see the About information your previously added. Next to it is a little box called Photos. This is like your Photos on your regular Facebook account. It’s a good idea to start uploading images to your account. Maybe select some of your favorites from past blog posts. The more images you have, the better. People want to see that you’re engaged with your followers. It will also populate your timeline with interesting content.
Rather than uploading all your images in one day, space them out over the course of a couple weeks. That way there’s something new every day and over time you’ll build a good repository of images for new followers to enjoy.
Next to that Photos box is a little down arrow. Click on it. You’ll notice a row of boxes with plus signs appear. Click on a plus sign and you’ll have options of things you can add to these boxes. These boxes act like mini sections to your Facebook page and are chances for your followers to learn more about your blog. Take the time to flush these out. You can add the options they show, or click on Find More Apps to search for other apps to add to your page.

Posting to Your Page
You now have your Facebook page set up. That’s the easy part. The hard part is managing this page. Just like you have to put in a lot of thought, time and effort to manage your blog, you must do the same on your Facebook page.
Every day you should post something. Remember our discussion last week about the difference between telling and showing. Don’t just throw things at your readers. Show them something interesting AND ask them questions. The fastest way to get people to comment is to ask them a question that they want to answer. Maybe post a picture and ask what people think. Maybe you wrote a blog post about a movie you just saw. Ask your followers what their favorite moment was. Anything to get people engaged and talking.

Whenever you post a new blog post, you will probably want to share the link to that post (to the specific post, not to your blog in general). This will help direct people to your site. But, do not let these posts be your only post each day. Facebook pages that are full of these updates are boring and will not gain followers. So, each day, you will really need to post a link to your daily blog post as well as some other update.
Also, mix things up by adding pictures and videos. Text updates are fine and are the most common because they are easy and quick. But adding fun pictures and video is another great way to increase engagement. That’s easy enough. Spend some time on Pinterest and YouTube to generate ideas.
Remember, your Facebook page is an extension of your blog. The whole purpose is to get people excited about reading your blog. If people aren’t excited about your Facebook page and that’s their only interaction with your blog, what’s their motivation to go to your blog? On the other hand, if you make a good first impression, you may find you just gained a Facebook follower and a new reader.
This is all important, but the trouble with all the social media is that it is such a TIME EATER. I handle my Cranberry Morning blog and my SoapnSuch.com store, but my daughter takes care of my Facebook page. As far as Twitter goes, I've tweeted twice. lol This bird has a nest to take care of and beaks to fill. What on earth did we do fifteen years ago??
This is GREAT! thanks for all the info!
Just spent some more time reading. You can't put your URL on your cover photo on Facebook. You can have the name of your page, but not the URL of your blog on the cover photo. Just an FYI.