Whew! We made it through the social media trainings for your blog, at least as far as Facebook and Google+ are concerned. I still want to get to Twitter, but I felt a break was needed before tackling Twitter, especially since many people are unsure how to use Twitter.
One of the most common pieces of feedback I received through this series was asking how to juggle all these social media sites for your blog. After all, it does take a lot of time. Is there an easier way?
Of course, the answer is yes.
While there are a number of great options out there to simplify social media, I’m going to share one of the easiest and most powerful. It’s called HootSuite. You may have seen it on some of your friends’ Facebook posts.

HootSuite is basically a one-stop social media management system. With one HootSuite account, you can link up to 5 social media sites for free and manage them all from one location. That means when you write a post, you can automatically have it post in Facebook and Twitter and Google+. One post, three locations (or more). How’s that for simple?
HootSuite has a free side and a paid side. The difference between the two is the paid version allows you to link more social media accounts and has more powerful post scheduling and analytics features. So if you’re really into social media for your blog and find it drives lots of traffic to your blog, it may just be worth the low $9.99/month price tag. For most bloggers, the free version should be a good way to get your feet wet.
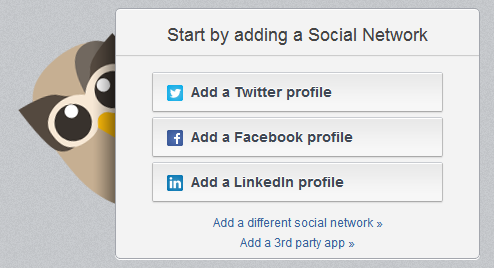
To get started, go to http://hootsuite.com/ and fill out the quick registration form on the home page. As soon as you’re signed in you will be asked to add a social network. By default, you are given a choice between Twitter, Facebook and LinkedIn. You can add more later though. Facebook is an easy place to start so click on the Add a Facebook Profile link.
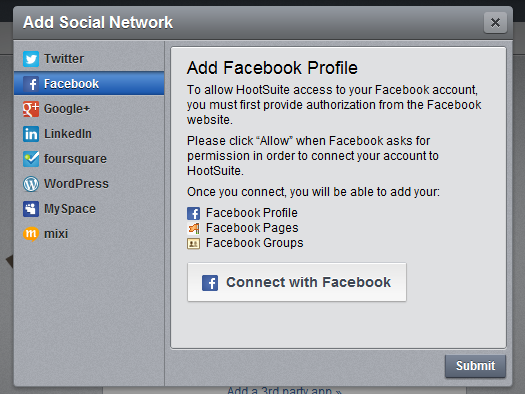
This brings up the Add Social Network dialog box. From here, you can select another social media account or continue with Facebook. Since the process is pretty much the same regardless of the account, let’s demonstrate how to add an account with Facebook. Click on the Connect with Facebook button. This will bring up a Facebook login screen. Type your username and password and authorize everything it asks. It may feel daunting how much they ask for, but remember, you’re giving this site control over your pages so you don’t have to log in to each social media account separately. HootSuite is secure and has a good track record. I’m paranoid about giving apps and other sites access to my Facebook and I allowed it.
OK, so you’re registered with Facebook. By default, they approve your personal Facebook account. It’s up to you if you want to manage your personal account from HootSuite or if you just want to use HootSuite for your social media accounts. Remember, you only get a total of 5 accounts and your personal Facebook counts as one of them, so if you get pressed for space, you can remove it.
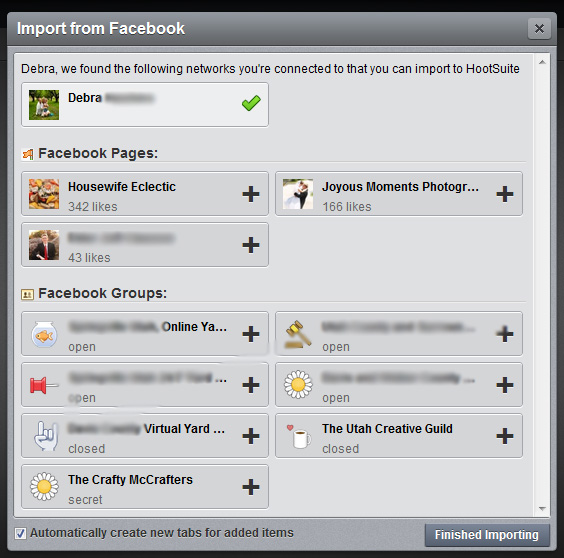
Underneath your personal account, you will see the pages you own (you should have at least one for the Facebook page you created for your blog). To add this page, simply click on the plus sign and it will change to a green check mark. You can also manage groups you belong to, but remember, those also count toward your 5 limit.
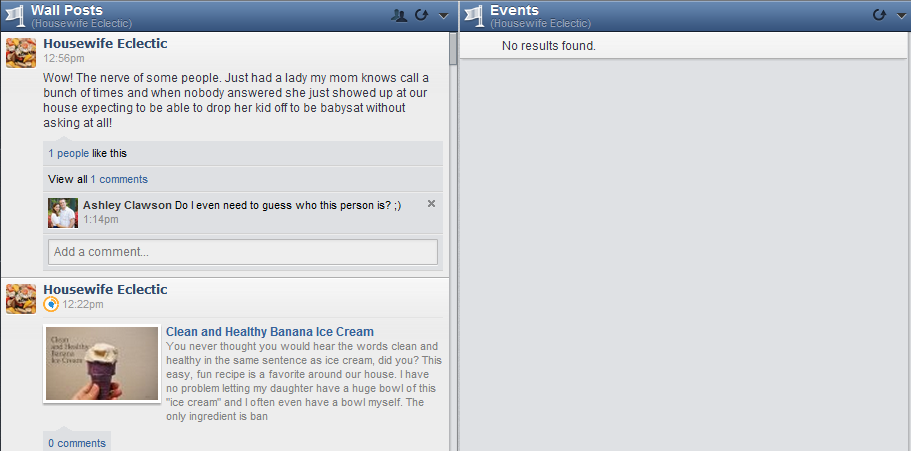
Once you’re done importing your Facebook accounts, you will be taken to your main screen which has tabs across the top, similar to a web browser. Click over to your blog’s Facebook page. By default, you are given a Wall Posts feed and Events feed. This automatically updates when you load the screen. If you want to refresh while you’re looking at it, simply click the refresh icon.
You can add other “streams” to your tab too. A stream is extra content from the social media service that you can flow in. This helps you get a better feel for what’s going on. To do this, go to the top-left corner and click where it says Add Stream. You will then need to click on the Facebook option and select your profile (is it for your personal account or blog page). Then you can add whichever streams you want. It’s really up to you how many streams you will need.
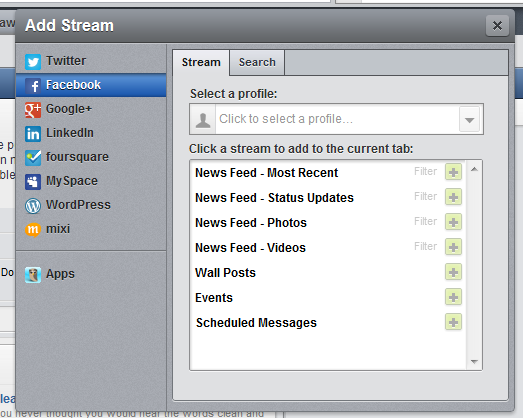
Notice in the image below how I added a Scheduled Stream Posts stream. It’s empty now, but as I add things this section will auto-populate.

OK, so now that you know how to add an account and set it up, go ahead and add your Facebook and Google+ pages, if you have them. To do this, click on the Getting Started tab and select Add Another Social Network. Go through similar setup steps to what you did for Facebook.
Once you have all your accounts setup, now it’s time to see the real power behind HootSuite: multi-posting. That’s right, by typing one post, you can easily share it with all your other accounts. It will save you a lot of time. Of course, this doesn’t save you time if you want to be unique on each account, but even at that it’s useful because you don’t have to log in and out of one account at a time. It’s all here.
In the top-left corner, you will see a posting field, similar to Facebook, Twitter and Google+. Start typing your post, just as you would in any of those sites. You can also add a link, image/file and location. As you type, you’ll notice a number counts down. This tells you how many characters you have left, which is mostly for Twitter purposes.
Once your post is completed, do NOT post yet. Why? Because you haven’t told HootSuite which account to post from. To do this, go to the empty field to the right of the compose field. In the dropdown menu click on any of the social media accounts you want to share this particular post with. You can do one or many. As you add them, they will disappear from the dropdown list and just the icon will appear in the field above.
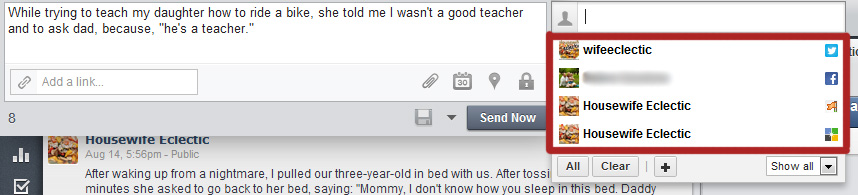
If everything looks just right, you can press the Send Now button. Give it a few seconds and you will see your post appear in all the accounts you told it to. Simple as that!

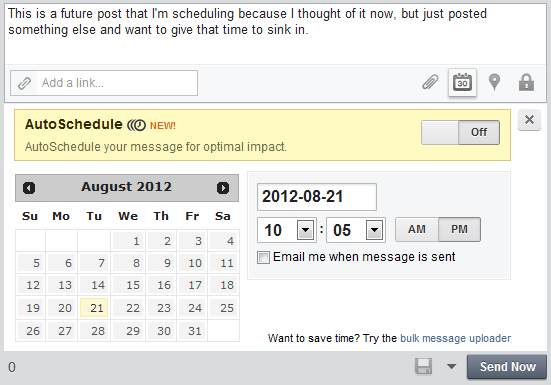
But wait, it gets better! Have you ever had a time where you published a post and immediately afterward you thought of another awesome post idea? You want to post again, but worry if you do people will feel spammed or won’t read your first post. This is especially important when posting to your blog account. HootSuite resolves this problem by allowing you to schedule posts. So you can type the post now and schedule it to automatically post at another time. This is also good for those busy weeks or vacation times.
To schedule a post, write the post as you normally would and click on the little calendar icon. This brings up the scheduler where you can select the date and time for it to post. You can also choose AutoSchedule, which allows HootSuite to determine the best time for your post.
As you can see, HootSuite is an amazingly powerful service that can simplify your social media experience and make social media an enjoyable experience for your blog rather than just another hassle.
You are so full of information! Had no clue what this was all about. Thanks for sharing! I found you on Facebook! Don't know why that took so long!
I'm a proud Neoluddite who, while she appreciates your tutorials, is still often confused by all this computer nonsense. But even *I* give kudos to HootSuite, which makes my life so much easier every morning when I can post on multiple sites with one "click" ….