• Skip to secondary menu
  • Skip to main content
  • Skip to primary sidebar

Housewife Eclectic

Recipes, Crafts, Book Reviews and More

  • Tutorials
  • Recipes
  • Books
  • Parenting
  • Tech Help
  • About Me
  • Printable Store

Harry Potter Quidditch Cake

March 18, 2019 by Wifeeclectic Leave a Comment

My girls love to bake and create cakes. Sometimes I can find the decorating of cakes a little overwhelming but lately, I have been using my Cricut Maker for all of the little details and I have LOVED how each cake is turning out. This Snitch/Quidditch cake is our latest masterpiece and it came together quickly with the help of chipboard and fondant.

For this Cake and Fondant you will need:

  • 1 Cake Mix and everything you need to make it in two 8-inch rounds
  • frosting
  • a bag of marshmallows
  • powdered sugar (I used a full bag and a little extra)
  • black piping gel
  • rolling pin
  • green gel food coloring

For this cake decor you will need:

  • Cricut Heavy Chipboard
  • Cricut Maker
  • Cricut Knife Blade
  • Felt in your house color
  • iron-on in your house color
  • Gold food coloring spray
  • white cardstock
  • toothpicks
  • baker’s twine
  • hot glue

Be sure to use the code ECLECTICSPRING  for 10% off materials and supplies on orders over $50 or more on Cricut.com

How to use the Cricut Knife Blade

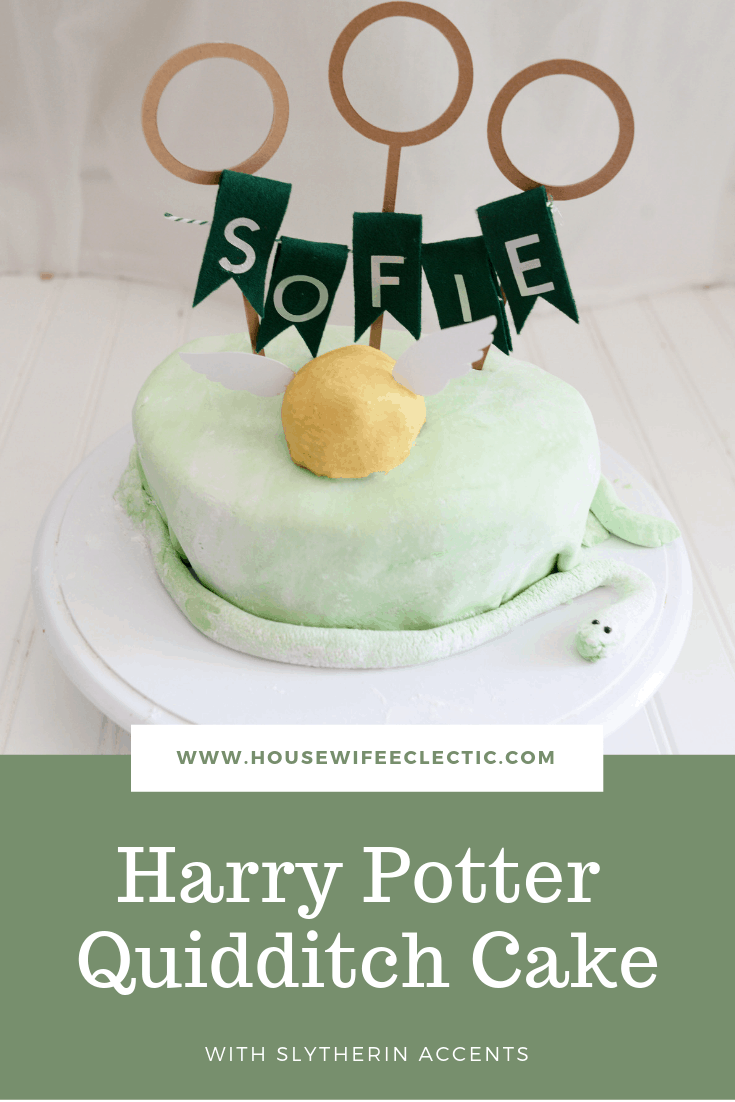
My absolute favorite thing about my Cricut Maker is the ability to cut heavy duty materials.  Chipboard and Basswood are my favorite things to cut. The ability to cut heavy-duty items really opens up the crafting possibilities. One of the things that I have had the most fun experimenting with is cake toppers! I love that you aren’t limiting by the fandoms on the market, you can make just about anything.

For the Quidditch Pitch hoops, I combined Abstract Circle Vision (#MA5EF4B9) and a modified simple square. To make things really easy, you can find my cut files here.

Add the abstract circle to your canvas and use the contour palette in the bottom right corner to delete all of the extra cuts in the middle, leaving just the circle. Add a square to your artboard and unlock it, so you can change the shape to be long and skinny. Lay the skinny rectangle over the top of your circle design, where you want them to connect. Select your circle and the line and hit weld, so they become one object.

Now that the hoop is complete, resize it to 7 inches tall. Then copy and paste it two more times to your artboard.

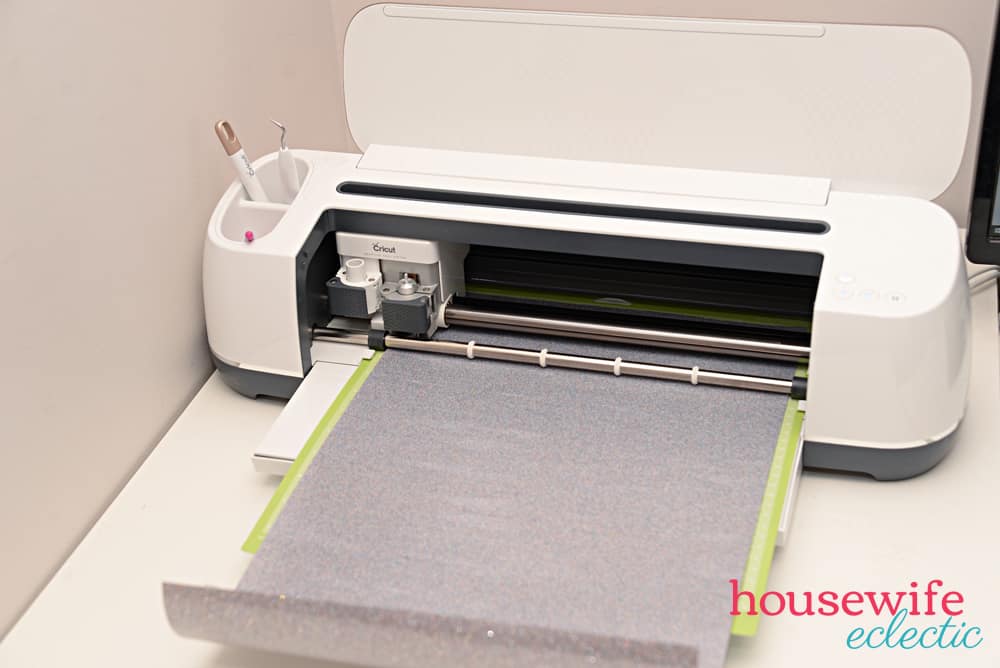
Secure your chipboard to a heavy grip mat. I also secured the chipboard with a few small strips of duct tape. I knew that the material would need many passes and I didn’t want to risk the chipboard moving. Before you load the chipboard into your machine, slide the white grips on the machine all the way to the sides.

Add your knife blade into your Maker and set your machine to Heavy Chipboard.

You May Also Like: Harry Potter Vacation Memory Box

The machine will take about 20 minutes to cut these. Once they are done, pull them off of the mat and set them aside. Now pull out your rotary blade and felt in your house colors and get ready to cut felt!

How To Cut Felt with the Cricut Rotary Blade

Put your felt down on your fabric grip mat and roll a brayer over felt to help secure it to the mat. Add the rotary blade to your make and load the felt into your machine. When you select felt on your materials list, your machine will default to the fine point blade, I find the that the rotary blade does such a great job with felt that I always want to use that. Simple edit the tool and select the rotary blade instead.

For these flags, I used Cricut Shape – Flags #M7F4A9EE. I copied and pasted a second flag and then rotated the second flag upside down. Then I laid the two flags on top of each other and welded them together to make a complete flag. To make things really easy, use my flag cut file here. 

You May Also Like: Harry Potter Picnic Blanket

Cut out one flag for each letter of the name you want on the cake.  After you are done cutting the flags, cut our the Snitch wings on white cardstock. Use my wing cut file here.
Cut out the name in iron-on that matches your house colors. Use your EasyPress to iron the letters to the felt. I used my EasyPress set at 350 degrees for 30 seconds and they turned out perfectly. After each flag has a letter on it. Flip it in half over a piece of bakers twine and hot glue it to itself.
Now its time to make the cake!
Bake 2 8-inch cakes and allow the cakes to cool completely. If your cake has a dome, slice the dome off with a knife to make the cake level. Place the first layer of the cake upside down on your cake plate and add a layer of frosting. Place the second 8-inch cake on top, upside down (it gives it a cleaner surface to frost) and frost it completely.
Prepare the fondant by microwaving a bag or marshmallows in a microwave safe bowl for 2 minutes. Add the melted marshmallows to your stand mixer and mix.
While mixing, add four tablespoons of water and the green food coloring gel to the marshmallows. Then add the bag of powdered sugar one cup at a time until the mixture stiffens.
Pull the mixture out and knead it with your hands on a surface covered in powdered sugar. When the fondant has a consistency of stiff dough, roll the fondant out thin and large enough to cover the cake.

Using both of your arms, lay the fondant over the stacked 8-inch cakes. Smooth the fondant down and then trim off the excess.

If you are making a Slytherin cake, take the excess that you trimmed off and roll it into a long snake and wrap it around the base of the cake. Add two dots of piping gel to the head of the snake for the eyes.
Take a handful of the extra cake that you trimmed off earlier and add a tablespoon of frosting to it. Roll it all together until you get a good size cake ball. Roll out a piece of extra fondant and cover the cake ball in the fondant. Sealing the ball at the bottom. Spray the cake ball with the gold food coloring spray until a nice gold color. Allow it to dry completely, push the cardstock wings into either side of the cake ball and set on the front of the cake.
Attach the quidditch hoops to toothpicks with hot glue and then gently push them into the cake with the middle one standing taller. Loop your flags over a piece of twine and hot glue them in place. String the twine between the Quidditch hoops to finish your cake!
What house colors would you make your cake?

post signature

This is a sponsored conversation written by me on behalf of Cricut. The opinions and text are all mine.

Love Harry Potter? You May Also Like: 

Harry Potter House Necklaces

Harry Potter Pinata

Harry Potter Party

Free Harry Potter Acceptance Letter


Filed Under: Cricut, Desserts, Geek Blogging, Harry Potter, Recipes, Tutorials Tagged With: Harry Potter, Tasty Tuesdays

Reader Interactions

Leave a Reply Cancel reply

Your email address will not be published. Required fields are marked *

Recipe Rating


Primary Sidebar

Connect with Us

Facebook
Twitter
Follow Me
Instagram
Pinterest
RSS
Follow by Email

Welcome to Housewife Eclectic

Debra Hawkins - Housewife EclecticHi, I'm Debra. I am a craftaholic photographer married to a web-programming amateur chef with two sassy littles keeping it interesting. It gets crazy around here. Read More…

Archives

Copyright © 2023 · Lifestyle Pro on Genesis Framework · WordPress · Log in